授权 HttpServletRequests
Spring Security 允许您在请求级别建立授权模型。例如,使用 Spring Security,您可以声明 /admin 下的所有页面都需要一个特定的权限,而所有其他页面仅需要身份验证。
默认情况下,Spring Security 要求对每个请求进行身份验证。也就是说,每当您使用 HttpSecurity 实例 时,都必须声明您的授权规则。
每当你有一个 HttpSecurity 实例时,至少应该执行以下操作:
- Java
- Kotlin
- Xml
http
    .authorizeHttpRequests((authorize) -> authorize
        .anyRequest().authenticated()
    )
http {
    authorizeHttpRequests {
        authorize(anyRequest, authenticated)
    }
}
<http>
    <intercept-url pattern="/**" access="authenticated"/>
</http>
这告诉Spring Security,应用程序中的任何端点都要求安全上下文至少经过身份验证才能允许访问。
在许多情况下,您的授权规则会比这更复杂,因此请考虑以下用例:
-
我有一个使用
authorizeRequests的应用,想要将其迁移到 authorizeHttpRequests -
我想匹配请求,并且将 Spring MVC 映射到默认 servlet 以外的其他内容
-
我想授权请求
-
我想将请求授权委托给策略代理
理解请求授权组件的工作原理
本节基于 Servlet 架构与实现,深入探讨在基于 Servlet 的应用程序中,授权 如何在请求级别工作。
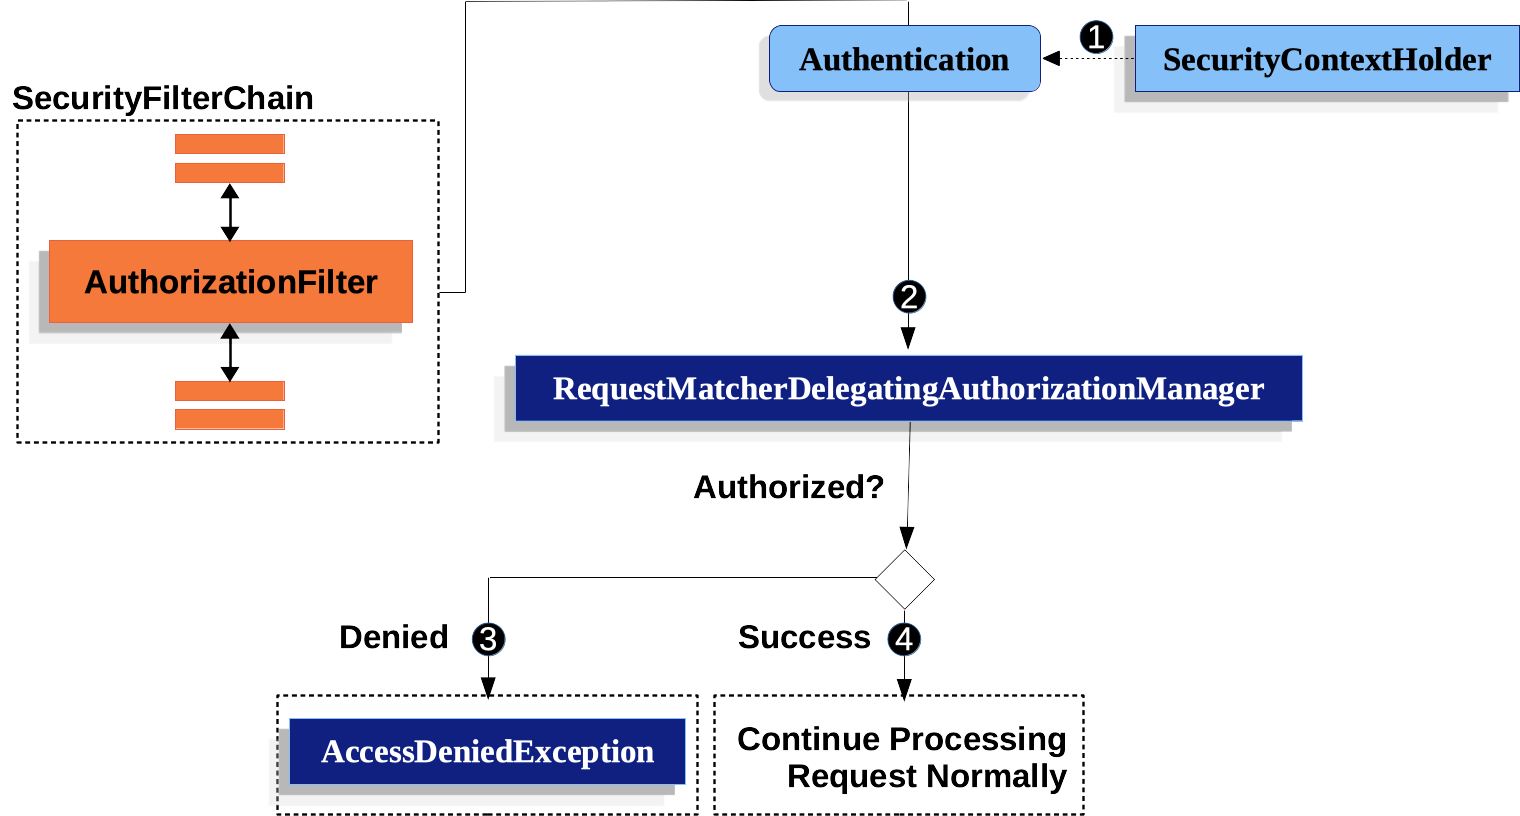
图 1. 授权 HttpServletRequest
-
1 首先,
AuthorizationFilter构建一个Supplier,用于从 SecurityContextHolder 中获取 Authentication。 -
2 其次,它将
Supplier<Authentication>和HttpServletRequest传递给 AuthorizationManager。AuthorizationManager将请求与authorizeHttpRequests中的模式进行匹配,并运行相应的规则。-
3 如果授权被拒绝,则会发布一个 AuthorizationDeniedEvent,并抛出
AccessDeniedException。在这种情况下,ExceptionTranslationFilter 会处理AccessDeniedException。 -
4 如果访问被授予,则会发布一个 AuthorizationGrantedEvent,并且
AuthorizationFilter会继续执行 FilterChain,从而允许应用程序正常处理。
-
AuthorizationFilter 默认最后执行
默认情况下,AuthorizationFilter 位于 Spring Security 过滤器链 的末端。这意味着 Spring Security 的 身份验证过滤器、漏洞防护 以及其他过滤器集成都不需要授权。如果您在 AuthorizationFilter 之前添加自己的过滤器,这些过滤器同样不需要授权;否则,它们将需要授权。
这种情况通常在你添加 Spring MVC 端点时变得尤为重要。因为这些端点由 DispatcherServlet 执行,而它位于 AuthorizationFilter 之后,所以你的端点需要被包含在 authorizeHttpRequests 中才能获得授权。
所有调度均已授权
AuthorizationFilter 不仅在每个请求上运行,而且在每次调度时都会执行。这意味着不仅 REQUEST 调度需要授权,FORWARD、ERROR 和 INCLUDE 调度同样需要授权。
例如,Spring MVC 可以将请求 FORWARD 给一个视图解析器,该解析器会渲染 Thymeleaf 模板,如下所示:
- Java
- Kotlin
@Controller
public class MyController {
    @GetMapping("/endpoint")
    public String endpoint() {
        return "endpoint";
    }
}
@Controller
class MyController {
    @GetMapping("/endpoint")
    fun endpoint(): String {
        return "endpoint"
    }
}
在这种情况下,授权会进行两次:一次用于授权访问 /endpoint 端点,另一次用于转发到 Thymeleaf 以渲染 "endpoint" 模板。
因此,您可能需要允许所有 FORWARD 调度。
该原则的另一个示例是Spring Boot 处理错误的方式。如果容器捕获到异常,例如以下情况:
- Java
- Kotlin
@Controller
public class MyController {
    @GetMapping("/endpoint")
    public String endpoint() {
        throw new UnsupportedOperationException("unsupported");
    }
}
@Controller
class MyController {
    @GetMapping("/endpoint")
    fun endpoint(): String {
        throw UnsupportedOperationException("unsupported")
    }
}
然后 Boot 会将其分派到 ERROR 调度。
在这种情况下,授权也会发生两次:一次用于授权 /endpoint,另一次用于分发错误。
因此,你可能希望允许所有 ERROR 调度。
Authentication 查找被延迟
当请求始终被允许或始终被拒绝时,这一点对于 authorizeHttpRequests 很重要。在这些情况下,不会查询身份验证,从而使请求处理速度更快。
授权端点
你可以通过按优先级顺序添加更多规则来配置Spring Security,使其具有不同的规则。
如果你希望 /endpoint 仅允许拥有 USER 权限的终端用户访问,那么可以这样做:
- Java
- Kotlin
- Xml
@Bean
public SecurityFilterChain web(HttpSecurity http) throws Exception {
    http
        .authorizeHttpRequests((authorize) -> authorize
	    .requestMatchers("/endpoint").hasAuthority("USER")
            .anyRequest().authenticated()
        )
        // ...

    return http.build();
}
@Bean
fun web(http: HttpSecurity): SecurityFilterChain {
    http {
        authorizeHttpRequests {
            authorize("/endpoint", hasAuthority("USER"))
            authorize(anyRequest, authenticated)
        }
    }

    return http.build()
}
<http>
    <intercept-url pattern="/endpoint" access="hasAuthority('USER')"/>
    <intercept-url pattern="/**" access="authenticated"/>
</http>
如你所见,声明可以分解为模式/规则对。
AuthorizationFilter 会按照列出的顺序处理这些权限对,仅对请求应用第一个匹配项。这意味着即使 /** 也会匹配 /endpoint,但上述规则不会产生问题。解读上述规则的方式是:"如果请求是 /endpoint,则要求 USER 权限;否则,仅要求身份验证"。
Spring Security 支持多种模式和规则;您也可以通过编程方式创建自己的模式和规则。
授权后,你可以通过以下方式使用 Security 的测试支持 进行测试:
- Java
@WithMockUser(authorities="USER")
@Test
void endpointWhenUserAuthorityThenAuthorized() {
    this.mvc.perform(get("/endpoint"))
        .andExpect(status().isOk());
}

@WithMockUser
@Test
void endpointWhenNotUserAuthorityThenForbidden() {
    this.mvc.perform(get("/endpoint"))
        .andExpect(status().isForbidden());
}

@Test
void anyWhenUnauthenticatedThenUnauthorized() {
    this.mvc.perform(get("/any"))
        .andExpect(status().isUnauthorized());
}
匹配请求
上面你已经看到了两种匹配请求的方法。
你首先看到的是最简单的,即匹配任何请求。
使用 Ant 进行匹配
Ant 是 Spring Security 默认用于匹配请求的语言。
你可以用它来匹配单个端点或目录,甚至可以捕获占位符以供后续使用。你还可以进一步细化,使其匹配特定的HTTP方法集。
假设你不想匹配 /endpoint 端点,而是想匹配 /resource 目录下的所有端点。在这种情况下,你可以这样做:
- Java
- Kotlin
- Xml
http
    .authorizeHttpRequests((authorize) -> authorize
        .requestMatchers("/resource/**").hasAuthority("USER")
        .anyRequest().authenticated()
    )
http {
    authorizeHttpRequests {
        authorize("/resource/**", hasAuthority("USER"))
        authorize(anyRequest, authenticated)
    }
}
<http>
    <intercept-url pattern="/resource/**" access="hasAuthority('USER')"/>
    <intercept-url pattern="/**" access="authenticated"/>
</http>
这句话的意思是:"如果请求是 /resource 或其子目录,则需要 USER 权限;否则,仅需要身份验证。"
您也可以从请求中提取路径值,如下所示:
- Java
- Kotlin
- Xml
http
    .authorizeHttpRequests((authorize) -> authorize
        .requestMatchers("/resource/{name}").access(new WebExpressionAuthorizationManager("#name == authentication.name"))
        .anyRequest().authenticated()
    )
http {
    authorizeHttpRequests {
        authorize("/resource/{name}", WebExpressionAuthorizationManager("#name == authentication.name"))
        authorize(anyRequest, authenticated)
    }
}
<http>
    <intercept-url pattern="/resource/{name}" access="#name == authentication.name"/>
    <intercept-url pattern="/**" access="authenticated"/>
</http>
授权后,你可以通过以下方式使用Security的测试支持进行测试:
- Java
@WithMockUser(authorities="USER")
@Test
void endpointWhenUserAuthorityThenAuthorized() {
    this.mvc.perform(get("/endpoint/jon"))
        .andExpect(status().isOk());
}

@WithMockUser
@Test
void endpointWhenNotUserAuthorityThenForbidden() {
    this.mvc.perform(get("/endpoint/jon"))
        .andExpect(status().isForbidden());
}

@Test
void anyWhenUnauthenticatedThenUnauthorized() {
    this.mvc.perform(get("/any"))
        .andExpect(status().isUnauthorized());
}
Spring Security 仅匹配路径。如果您需要匹配查询参数,则需要自定义请求匹配器。
使用正则表达式进行匹配
Spring Security 支持通过正则表达式匹配请求。当您希望对子目录应用比 ** 更严格的匹配条件时,这会非常有用。
例如,考虑一个包含用户名的路径,以及所有用户名必须为字母数字的规则。您可以使用 RegexRequestMatcher 来遵循此规则,如下所示:
- Java
- Kotlin
- Xml
http
    .authorizeHttpRequests((authorize) -> authorize
        .requestMatchers(RegexRequestMatcher.regexMatcher("/resource/[A-Za-z0-9]+")).hasAuthority("USER")
        .anyRequest().denyAll()
    )
http {
    authorizeHttpRequests {
        authorize(RegexRequestMatcher.regexMatcher("/resource/[A-Za-z0-9]+"), hasAuthority("USER"))
        authorize(anyRequest, denyAll)
    }
}
<http>
    <intercept-url request-matcher="regex" pattern="/resource/[A-Za-z0-9]+" access="hasAuthority('USER')"/>
    <intercept-url pattern="/**" access="denyAll"/>
</http>
按 HTTP 方法匹配
您还可以根据HTTP方法来匹配规则。这在按授予的权限(如read或write权限)进行授权时非常方便。
要要求所有 GET 请求都具备 read 权限,所有 POST 请求都具备 write 权限,你可以这样做:
- Java
- Kotlin
- Xml
http
    .authorizeHttpRequests((authorize) -> authorize
        .requestMatchers(HttpMethod.GET).hasAuthority("read")
        .requestMatchers(HttpMethod.POST).hasAuthority("write")
        .anyRequest().denyAll()
    )
http {
    authorizeHttpRequests {
        authorize(HttpMethod.GET, hasAuthority("read"))
        authorize(HttpMethod.POST, hasAuthority("write"))
        authorize(anyRequest, denyAll)
    }
}
<http>
    <intercept-url http-method="GET" pattern="/**" access="hasAuthority('read')"/>
    <intercept-url http-method="POST" pattern="/**" access="hasAuthority('write')"/>
    <intercept-url pattern="/**" access="denyAll"/>
</http>
这些授权规则应解读为:"若请求为 GET 方法,则需具备 read 权限;否则,若请求为 POST 方法,则需具备 write 权限;其余情况均拒绝该请求"
默认拒绝请求是一种良好的安全实践,因为它将规则集转变为允许列表。
授权后,你可以通过以下方式使用 Security 的测试支持 进行测试:
- Java
@WithMockUser(authorities="read")
@Test
void getWhenReadAuthorityThenAuthorized() {
    this.mvc.perform(get("/any"))
        .andExpect(status().isOk());
}

@WithMockUser
@Test
void getWhenNoReadAuthorityThenForbidden() {
    this.mvc.perform(get("/any"))
        .andExpect(status().isForbidden());
}

@WithMockUser(authorities="write")
@Test
void postWhenWriteAuthorityThenAuthorized() {
    this.mvc.perform(post("/any").with(csrf()))
        .andExpect(status().isOk());
}

@WithMockUser(authorities="read")
@Test
void postWhenNoWriteAuthorityThenForbidden() {
    this.mvc.perform(get("/any").with(csrf()))
        .andExpect(status().isForbidden());
}
按调度器类型匹配
此功能目前在 XML 中不受支持
如前所述,Spring Security 默认对所有分发类型进行授权。尽管在 REQUEST 分发中建立的安全上下文会延续到后续分发中,但细微的不匹配有时可能导致意外的 AccessDeniedException。
为此,你可以配置 Spring Security 的 Java 配置,以允许诸如 FORWARD 和 ERROR 之类的分发器类型,如下所示:
- Java
- Kotlin
http
    .authorizeHttpRequests((authorize) -> authorize
        .dispatcherTypeMatchers(DispatcherType.FORWARD, DispatcherType.ERROR).permitAll()
        .requestMatchers("/endpoint").permitAll()
        .anyRequest().denyAll()
    )
http {
    authorizeHttpRequests {
        authorize(DispatcherTypeRequestMatcher(DispatcherType.FORWARD), permitAll)
        authorize(DispatcherTypeRequestMatcher(DispatcherType.ERROR), permitAll)
        authorize("/endpoint", permitAll)
        authorize(anyRequest, denyAll)
    }
}
通过Servlet路径匹配
一般来说,你可以像上面演示的那样使用 requestMatchers(String)。
然而,如果你有来自多个servlet的授权规则,则需要指定这些规则:
- Java
- Kotlin
- Xml
import static org.springframework.security.web.servlet.util.matcher.PathPatternRequestMatcher.withDefaults;

@Bean
SecurityFilterChain appEndpoints(HttpSecurity http) {
	PathPatternRequestMatcher.Builder mvc = withDefaults().basePath("/spring-mvc");
	http
        .authorizeHttpRequests((authorize) -> authorize
            .requestMatchers(mvc.matcher("/admin/**")).hasAuthority("admin")
            .requestMatchers(mvc.matcher("/my/controller/**")).hasAuthority("controller")
            .anyRequest().authenticated()
        );

	return http.build();
}
@Bean
fun appEndpoints(http: HttpSecurity): SecurityFilterChain {
    http {
        authorizeHttpRequests {
            authorize("/spring-mvc", "/admin/**", hasAuthority("admin"))
            authorize("/spring-mvc", "/my/controller/**", hasAuthority("controller"))
            authorize(anyRequest, authenticated)
        }
    }
}
<http>
    <intercept-url servlet-path="/spring-mvc" pattern="/admin/**" access="hasAuthority('admin')"/>
    <intercept-url servlet-path="/spring-mvc" pattern="/my/controller/**" access="hasAuthority('controller')"/>
    <intercept-url pattern="/**" access="authenticated"/>
</http>
这是因为 Spring Security 要求所有 URI 必须是绝对的(不包括上下文路径)。
还有一些其他组件可以为你创建请求匹配器,例如 PathRequest#toStaticResources#atCommonLocations
使用自定义匹配器
此功能目前在 XML 中不受支持
在 Java 配置中,您可以创建自己的 RequestMatcher 并通过 DSL 进行配置,如下所示:
- Java
- Kotlin
RequestMatcher printview = (request) -> request.getParameter("print") != null;
http
    .authorizeHttpRequests((authorize) -> authorize
        .requestMatchers(printview).hasAuthority("print")
        .anyRequest().authenticated()
    )
val printview: RequestMatcher = { (request) -> request.getParameter("print") != null }
http {
    authorizeHttpRequests {
        authorize(printview, hasAuthority("print"))
        authorize(anyRequest, authenticated)
    }
}
由于 RequestMatcher 是一个函数式接口,你可以在 DSL 中以 lambda 表达式的形式提供它。然而,如果你需要从请求中提取值,则需要一个具体的类,因为这需要重写一个 default 方法。
授权后,你可以通过以下方式使用Security的测试支持进行测试:
- Java
@WithMockUser(authorities="print")
@Test
void printWhenPrintAuthorityThenAuthorized() {
    this.mvc.perform(get("/any?print"))
        .andExpect(status().isOk());
}

@WithMockUser
@Test
void printWhenNoPrintAuthorityThenForbidden() {
    this.mvc.perform(get("/any?print"))
        .andExpect(status().isForbidden());
}
授权请求
一旦请求被匹配,你可以通过几种方式对其进行授权,之前已经介绍过,例如 permitAll、denyAll 和 hasAuthority。
简单总结一下,以下是内置于DSL的授权规则:
-
permitAll- 请求无需授权,属于公共端点;请注意,在这种情况下,认证信息不会从会话中获取 -
denyAll- 在任何情况下都不允许该请求;请注意,在这种情况下,Authentication不会从会话中获取 -
hasAuthority- 请求要求Authentication拥有与给定值匹配的 GrantedAuthority -
hasRole-hasAuthority的快捷方式,会自动添加ROLE_前缀或配置的默认前缀 -
hasAnyAuthority- 请求要求Authentication拥有与任意给定值匹配的GrantedAuthority -
hasAnyRole-hasAnyAuthority的快捷方式,会自动添加ROLE_前缀或配置的默认前缀 -
hasAllRoles-hasAllAuthorities的快捷方式,会自动添加ROLE_前缀或配置的默认前缀 -
hasAllAuthorities- 请求要求Authentication拥有与所有给定值匹配的GrantedAuthority -
access- 请求使用此自定义AuthorizationManager来确定访问权限
现在你已经学习了模式、规则以及它们如何组合在一起,你应该能够理解下面这个更复杂的例子了:
- Java
import static jakarta.servlet.DispatcherType.*;

import static org.springframework.security.authorization.AuthorizationManagers.allOf;
import static org.springframework.security.authorization.AuthorityAuthorizationManager.hasAuthority;
import static org.springframework.security.authorization.AuthorityAuthorizationManager.hasRole;

@Bean
SecurityFilterChain web(HttpSecurity http) throws Exception {
	http
		// ...
		.authorizeHttpRequests((authorize) -> authorize                                  1
            .dispatcherTypeMatchers(FORWARD, ERROR).permitAll() 2
			.requestMatchers("/static/**", "/signup", "/about").permitAll()         3
			.requestMatchers("/admin/**").hasRole("ADMIN")                             4
			.requestMatchers("/db/**").hasAllAuthorities("db", "ROLE_ADMIN")   5
			.anyRequest().denyAll()                                                6
		);

	return http.build();
}
指定了多个授权规则。每个规则将按照声明的顺序依次被考虑。
允许
FORWARD和ERROR调度,以支持 Spring MVC 渲染视图以及 Spring Boot 渲染错误页面。我们指定了多个任何用户都可以访问的 URL 模式。具体来说,如果 URL 以 "/static/" 开头、等于 "/signup" 或等于 "/about",则任何用户都可以访问该请求。
任何以 "/admin/" 开头的 URL 将被限制为拥有 "ROLE_ADMIN" 角色的用户。您会注意到,由于我们调用了
hasRole方法,因此无需指定 "ROLE_" 前缀。任何以 "/db/" 开头的 URL 要求用户既被授予 "db" 权限,又具有 "ROLE_ADMIN" 角色。您会注意到,由于我们使用了
hasAllAuthorities表达式,因此必须指定 "ROLE_" 前缀。任何尚未匹配到的 URL 将被拒绝访问。如果您不想意外忘记更新授权规则,这是一个很好的策略。
自定义授权管理器
当你使用 authorizeHttpRequests DSL 时,Spring Security 会负责为你创建相应的 AuthorizationManager 实例。在某些情况下,你可能希望自定义创建的内容,以便完全控制在框架层面如何做出授权决策。
为了掌控创建 AuthorizationManager 实例以授权 HTTP 请求的过程,你可以创建一个自定义的 AuthorizationManagerFactory。例如,假设你想建立一条规则:已认证的用户必须同时拥有 USER 角色。为此,你可以为 HTTP 请求创建一个自定义实现,如下例所示:
- Java
- Kotlin
@Component
public class CustomHttpRequestsAuthorizationManagerFactory
		implements AuthorizationManagerFactory<RequestAuthorizationContext> {

	private final AuthorizationManagerFactory<RequestAuthorizationContext> delegate =
			new DefaultAuthorizationManagerFactory<>();

	@Override
	public AuthorizationManager<RequestAuthorizationContext> authenticated() {
		return AuthorizationManagers.allOf(
			this.delegate.authenticated(),
			this.delegate.hasRole("USER")
		);
	}

}
@Component
class CustomHttpRequestsAuthorizationManagerFactory : AuthorizationManagerFactory<RequestAuthorizationContext> {
    private val delegate = DefaultAuthorizationManagerFactory<RequestAuthorizationContext>()

    override fun authenticated(): AuthorizationManager<RequestAuthorizationContext> {
        return AuthorizationManagers.allOf(
            delegate.authenticated(),
            delegate.hasRole("USER")
        )
    }
}
现在,每当你需要身份验证时,Spring Security 将自动调用你的自定义工厂来创建一个 AuthorizationManager 实例,该实例要求身份验证和 USER 角色。
我们以此作为创建自定义 AuthorizationManagerFactory 的简单示例,不过也可以(通常更简单)仅为特定请求替换特定的 AuthorizationManager。有关示例,请参阅使用授权数据库、策略代理或其他服务。
使用 SpEL 表达授权
虽然推荐使用具体的 AuthorizationManager,但在某些情况下,表达式是必需的,例如在使用 <intercept-url> 或 JSP Taglibs 时。因此,本节将重点介绍这些领域的示例。
那么,让我们更深入地探讨一下 Spring Security 的 Web 安全授权 SpEL API。
Spring Security 将所有授权字段和方法封装在一组根对象中。最通用的根对象称为 SecurityExpressionRoot,它是 WebSecurityExpressionRoot 的基础。在准备评估授权表达式时,Spring Security 会将此根对象提供给 StandardEvaluationContext。
使用授权表达式字段和方法
首先,它提供了一套增强的授权字段和方法,可用于您的SpEL表达式。以下是对最常用方法的快速概述:
-
permitAll- 请求无需授权即可调用;请注意,在这种情况下,认证信息不会从会话中获取 -
denyAll- 在任何情况下都不允许该请求;请注意,在这种情况下,Authentication不会从会话中获取 -
hasAuthority- 请求要求Authentication拥有与给定值匹配的 GrantedAuthority -
hasRole-hasAuthority的快捷方式,会自动添加ROLE_前缀或配置的默认前缀 -
hasAnyAuthority- 请求要求Authentication拥有与任意给定值匹配的GrantedAuthority -
hasAnyRole-hasAnyAuthority的快捷方式,会自动添加ROLE_前缀或配置的默认前缀 -
hasPermission- 用于对象级授权的PermissionEvaluator实例钩子
以下是常见字段的简要介绍:
-
authentication- 与此方法调用关联的Authentication实例 -
principal- 与此方法调用关联的Authentication#getPrincipal
现在你已经学习了模式、规则以及它们如何组合在一起,你应该能够理解下面这个更复杂的例子了:
- Xml
<http>
    <intercept-url pattern="/static/**" access="permitAll"/> 1
    <intercept-url pattern="/admin/**" access="hasRole('ADMIN')"/> 2
    <intercept-url pattern="/db/**" access="hasAuthority('db') and hasRole('ADMIN')"/> 3
    <intercept-url pattern="/**" access="denyAll"/> 4
</http>
我们指定了一个所有用户均可访问的URL模式。具体来说,任何以"/static/"开头的请求,所有用户均可访问。
任何以"/admin/"开头的URL将仅限于拥有"ROLE_ADMIN"角色的用户访问。您会注意到,由于我们调用了
hasRole方法,因此无需指定"ROLE_"前缀。任何以"/db/"开头的URL要求用户同时被授予"db"权限并且是"ROLE_ADMIN"。您会注意到,由于我们使用了
hasRole表达式,因此无需指定"ROLE_"前缀。任何未被上述规则匹配的URL都将被拒绝访问。如果您不想意外忘记更新授权规则,这是一个很好的策略。
使用路径参数
此外,Spring Security 提供了一种发现路径参数的机制,因此这些参数也可以在 SpEL 表达式中被访问。
例如,您可以通过以下方式在SpEL表达式中访问路径参数:
- Xml
<http>
    <intercept-url pattern="/resource/{name}" access="#name == authentication.name"/>
    <intercept-url pattern="/**" access="authenticated"/>
</http>
该表达式指向 /resource/ 后的路径变量,并要求其等于 Authentication#getName。
使用授权数据库、策略代理或其他服务
如果你想配置 Spring Security 使用独立的服务进行授权,你可以创建自己的 AuthorizationManager 并将其与 anyRequest 匹配。
首先,你的 AuthorizationManager 可能看起来像这样:
- Java
@Component
public final class OpenPolicyAgentAuthorizationManager implements AuthorizationManager<RequestAuthorizationContext> {
    @Override
    public AuthorizationResult authorize(Supplier<Authentication> authentication, RequestAuthorizationContext context) {
        // make request to Open Policy Agent
    }
}
然后,你可以通过以下方式将其集成到 Spring Security:
- Java
@Bean
SecurityFilterChain web(HttpSecurity http, AuthorizationManager<RequestAuthorizationContext> authz) throws Exception {
	http
		// ...
		.authorizeHttpRequests((authorize) -> authorize
            .anyRequest().access(authz)
		);

	return http.build();
}
优先使用 permitAll 而非 ignoring
当您拥有静态资源时,可能会倾向于配置过滤器链来忽略这些值。更安全的方法是使用 permitAll 来允许它们,如下所示:
- Java
- Kotlin
http
    .authorizeHttpRequests((authorize) -> authorize
        .requestMatchers("/css/**").permitAll()
        .anyRequest().authenticated()
    )
http {
    authorizeHttpRequests {
        authorize("/css/**", permitAll)
        authorize(anyRequest, authenticated)
    }
}
这样更安全,因为即使是静态资源,设置安全响应头也很重要。如果请求被忽略,Spring Security 就无法为其添加安全头。
在过去,这种做法会带来性能上的折衷,因为Spring Security会在每个请求上查询会话。然而,从Spring Security 6开始,除非授权规则要求,否则会话将不再被频繁访问。由于性能影响现已得到解决,Spring Security建议至少对所有请求使用 permitAll。
从 authorizeRequests 迁移
AuthorizationFilter 已取代 FilterSecurityInterceptor。为了保持向后兼容性,FilterSecurityInterceptor 仍然是默认配置。本节将讨论 AuthorizationFilter 的工作原理以及如何覆盖默认配置。
AuthorizationFilter 为 HttpServletRequest 提供授权功能。它作为安全过滤器之一,被插入到 FilterChainProxy 中。
在声明 SecurityFilterChain 时,你可以覆盖默认设置。不要使用 authorizeRequests,而是使用 authorizeHttpRequests,如下所示:
- Java
@Bean
SecurityFilterChain web(HttpSecurity http) throws AuthenticationException {
    http
        .authorizeHttpRequests((authorize) -> authorize
            .anyRequest().authenticated();
        )
        // ...

    return http.build();
}
这在多个方面对 authorizeRequests 进行了改进:
-
使用简化的
AuthorizationManagerAPI 替代元数据源、配置属性、决策管理器和投票器。这简化了重用和定制过程。 -
延迟
Authentication查找。不再需要为每个请求查找认证信息,而仅在授权决策需要认证的请求中进行查找。 -
支持基于 Bean 的配置。
当使用 authorizeHttpRequests 替代 authorizeRequests 时,AuthorizationFilter 将替代 FilterSecurityInterceptor 被使用。
迁移表达式
在可能的情况下,建议使用类型安全的授权管理器替代 SpEL。对于 Java 配置,WebExpressionAuthorizationManager 可用于帮助迁移遗留的 SpEL。
要使用 WebExpressionAuthorizationManager,你可以用要迁移的表达式来构造一个实例,如下所示:
- Java
- Kotlin
.requestMatchers("/test/**").access(new WebExpressionAuthorizationManager("hasRole('ADMIN') && hasRole('USER')"))
.requestMatchers("/test/**").access(WebExpressionAuthorizationManager("hasRole('ADMIN') && hasRole('USER')"))
要迁移多个,你可以使用 WebExpressionAuthorizationManager#withDefaults:
- Java
- Kotlin
WebExpressionAuthorizationManager.Builder authz = WebExpressionAuthorizationManager.withDefaults();
.requestMatchers("/test/**").access(authz.expression("hasRole('ADMIN') && hasRole('USER')"))
.requestMatchers("/test/**").access(authz.expression("permitAll"))
var authz = WebExpressionAuthorizationManager.withDefaults()
.requestMatchers("/test/**").access(authz.expression("hasRole('ADMIN') && hasRole('USER')"))
.requestMatchers("/test/**").access(authz.expression("permitAll"))
如果你在表达式中引用一个bean,例如:@webSecurity.check(authentication, request),建议你直接调用该bean,类似以下方式:
- Java
- Kotlin
.requestMatchers("/test/**").access((authentication, context) ->
    new AuthorizationDecision(webSecurity.check(authentication.get(), context.getRequest())))
.requestMatchers("/test/**").access((authentication, context): AuthorizationManager<RequestAuthorizationContext> ->
    AuthorizationDecision(webSecurity.check(authentication.get(), context.getRequest())))
对于包含 bean 引用及其他表达式的复杂指令,建议您将其改为实现 AuthorizationManager 并通过调用 .access(AuthorizationManager) 来引用它们。
如果无法做到这一点,你可以将 WebExpressionAuthorizationManager.Builder 发布为一个 bean:
- Java
- Kotlin
@Bean
WebExpressionAuthorizationManager.Builder authz() {
	return WebExpressionAuthorizationManager.withDefaults();
}
@Bean
fun authz(): WebExpressionAuthorizationManager.Builder {
	return WebExpressionAuthorizationManager.withDefaults()
}
然后,传递给该构建器的表达式将能够引用bean。
安全匹配器
RequestMatcher 接口用于判断请求是否符合给定规则。我们使用 securityMatchers 来确定特定的 HttpSecurity 是否应应用于给定请求。同样地,我们可以使用 requestMatchers 来确定应应用于给定请求的授权规则。请看以下示例:
- Java
- Kotlin
@Configuration
@EnableWebSecurity
public class SecurityConfig {

	@Bean
	public SecurityFilterChain securityFilterChain(HttpSecurity http) throws Exception {
		http
			.securityMatcher("/api/**")                            1
			.authorizeHttpRequests((authorize) -> authorize
				.requestMatchers("/api/user/**").hasRole("USER")   2
				.requestMatchers("/api/admin/**").hasRole("ADMIN") 3
				.anyRequest().authenticated()                      4
			)
			.formLogin(withDefaults());
		return http.build();
	}
}
@Configuration
@EnableWebSecurity
open class SecurityConfig {

    @Bean
    open fun web(http: HttpSecurity): SecurityFilterChain {
        http {
            securityMatcher("/api/**")                                           // <1>
            authorizeHttpRequests {
                authorize("/api/user/**", hasRole("USER"))                       // <2>
                authorize("/api/admin/**", hasRole("ADMIN"))                     // <3>
                authorize(anyRequest, authenticated)                             // <4>
            }
        }
        return http.build()
    }

}
配置
HttpSecurity仅应用于以/api/开头的 URL允许具有
USER角色的用户访问以/api/user/开头的 URL允许具有
ADMIN角色的用户访问以/api/admin/开头的 URL任何不符合上述规则的请求,都需要进行身份验证
securityMatcher(s) 和 requestMatcher(s) 方法将使用一个 PathPatternRequestMatcher.Builder bean(如果可用)来构建 RequestMatcher。你可以在这里阅读更多关于 Spring MVC 集成的信息。
如果你想使用特定的 RequestMatcher,只需将实现传递给 securityMatcher 和/或 requestMatcher 方法:
- Java
- Kotlin
import static org.springframework.security.web.servlet.util.matcher.PathPatternRequestMatcher.withDefaults; 1
import static org.springframework.security.web.util.matcher.RegexRequestMatcher.regexMatcher;

@Configuration
@EnableWebSecurity
public class SecurityConfig {

	@Bean
	public SecurityFilterChain securityFilterChain(HttpSecurity http) throws Exception {
		http
			.securityMatcher(antMatcher("/api/**"))                              2
			.authorizeHttpRequests((authorize) -> authorize
				.requestMatchers(withDefaults().matcher("/api/user/**")).hasRole("USER")     3
				.requestMatchers(regexMatcher("/api/admin/.*")).hasRole("ADMIN") 4
				.requestMatchers(new MyCustomRequestMatcher()).hasRole("SUPERVISOR")     5
				.anyRequest().authenticated()
			)
			.formLogin(withDefaults());
		return http.build();
	}
}

public class MyCustomRequestMatcher implements RequestMatcher {

    @Override
    public boolean matches(HttpServletRequest request) {
        // ...
    }
}
import org.springframework.security.web.servlet.util.matcher.PathPatternRequestMatcher.withDefaults 1
import org.springframework.security.web.util.matcher.RegexRequestMatcher.regexMatcher

@Configuration
@EnableWebSecurity
open class SecurityConfig {

    @Bean
    open fun web(http: HttpSecurity): SecurityFilterChain {
        http {
            securityMatcher(antMatcher("/api/**"))                               // <2>
            authorizeHttpRequests {
                authorize(withDefaults().matcher("/api/user/**"), hasRole("USER"))           // <3>
                authorize(regexMatcher("/api/admin/**"), hasRole("ADMIN"))       // <4>
                authorize(MyCustomRequestMatcher(), hasRole("SUPERVISOR"))       // <5>
                authorize(anyRequest, authenticated)
            }
        }
        return http.build()
    }

}
从
PathPatternRequestMatcher和RegexRequestMatcher导入静态工厂方法以创建RequestMatcher实例。使用
PathPatternRequestMatcher配置HttpSecurity仅应用于以/api/开头的 URL。使用
PathPatternRequestMatcher允许具有USER角色的用户访问以/api/user/开头的 URL。使用
RegexRequestMatcher允许具有ADMIN角色的用户访问以/api/admin/开头的 URL。使用自定义的
RequestMatcher允许具有SUPERVISOR角色的用户访问与MyCustomRequestMatcher匹配的 URL。