HTTP 客户端
目录
Reactor Netty 提供了易于使用、易于配置的 HttpClient。它隐藏了创建 HTTP 客户端所需的大部分 Netty 功能,并加入了 Reactive Streams 背压。
1. 连接
要将 HTTP 客户端连接到给定的 HTTP 端点,您必须创建并配置一个 HttpClient 实例。默认情况下,主机配置为 localhost,端口为 80。以下示例展示了如何做到这一点:
import reactor.netty.http.client.HttpClient;

public class Application {

	public static void main(String[] args) {
		HttpClient client = HttpClient.create();  1

		client.get()                       2
		      .uri("https://example.com/") 3
		      .response()                  4
		      .block();
	}
}
创建一个可供配置的 HttpClient 实例。
指定将使用
GET方法。指定路径。
获取响应 HttpClientResponse
以下示例使用 WebSocket:
import io.netty.buffer.Unpooled;
import io.netty.util.CharsetUtil;
import reactor.core.publisher.Flux;
import reactor.netty.http.client.HttpClient;

public class Application {

	public static void main(String[] args) {
		HttpClient client = HttpClient.create();

		client.websocket()
		      .uri("wss://echo.websocket.org")
		      .handle((inbound, outbound) -> {
		          inbound.receive()
		                 .asString()
		                 .take(1)
		                 .subscribe(System.out::println);

		          final byte[] msgBytes = "hello".getBytes(CharsetUtil.ISO_8859_1);
		          return outbound.send(Flux.just(Unpooled.wrappedBuffer(msgBytes), Unpooled.wrappedBuffer(msgBytes)))
		                         .neverComplete();
		      })
		      .blockLast();
	}
}
1.1. 主机与端口
要连接到特定的主机和端口,您可以对 HTTP 客户端应用以下配置:
import reactor.netty.http.client.HttpClient;

public class Application {

	public static void main(String[] args) {
		HttpClient client =
				HttpClient.create()
				          .host("example.com") 1
				          .port(80);           2

		client.get()
		      .uri("/")
		      .response()
		      .block();
	}
}
配置
HTTP主机配置
HTTP端口
端口也可以通过 PORT 环境变量来指定。
2. 立即初始化
默认情况下,HttpClient 资源的初始化是按需进行的。这意味着 第一个请求 会承担初始化和加载所需的额外时间:
-
事件循环组
-
主机名解析器
-
本地传输库(使用本地传输时)
-
用于安全的本地库(当使用
OpenSsl时)
当您需要预加载这些资源时,可以按如下方式配置 HttpClient:
import reactor.core.publisher.Mono;
import reactor.netty.ByteBufFlux;
import reactor.netty.http.client.HttpClient;

public class Application {

	public static void main(String[] args) {
		HttpClient client = HttpClient.create();

		client.warmup() 1
		      .block();

		client.post()
		      .uri("https://example.com/")
		      .send(ByteBufFlux.fromString(Mono.just("hello")))
		      .response()
		      .block(); 2
	}
}
初始化并加载事件循环组、主机名解析器、本地传输库以及用于安全的本地库
主机名解析发生在第一个请求时。本示例使用了连接池,因此第一个请求会建立到该 URL 的连接,后续对同一 URL 的请求会复用连接池中的连接。
3. 写入数据
要向给定的 HTTP 端点发送数据,您可以使用 send(Publisher) 方法提供一个 Publisher。默认情况下,对于那些需要请求体的 HTTP 方法,会应用 Transfer-Encoding: chunked。如有必要,通过请求头提供的 Content-Length 会禁用 Transfer-Encoding: chunked。以下示例发送 hello:
import reactor.core.publisher.Mono;
import reactor.netty.ByteBufFlux;
import reactor.netty.http.client.HttpClient;

public class Application {

	public static void main(String[] args) {
		HttpClient client = HttpClient.create();

		client.post()
		      .uri("https://example.com/")
		      .send(ByteBufFlux.fromString(Mono.just("hello"))) 1
		      .response()
		      .block();
	}
}
向给定的
HTTP端点发送一个hello字符串
3.1. 添加请求头与其他元数据
向给定的 HTTP 端点发送数据时,您可能需要发送额外的请求头、Cookie 和其他元数据。您可以使用以下配置来做到这一点:
import io.netty.handler.codec.http.HttpHeaderNames;
import reactor.core.publisher.Mono;
import reactor.netty.ByteBufFlux;
import reactor.netty.http.client.HttpClient;

public class Application {

	public static void main(String[] args) {
		HttpClient client =
				HttpClient.create()
				          .headers(h -> h.set(HttpHeaderNames.CONTENT_LENGTH, 5)); 1

		client.post()
		      .uri("https://example.com/")
		      .send(ByteBufFlux.fromString(Mono.just("hello")))
		      .response()
		      .block();
	}
}
禁用
Transfer-Encoding: chunked并提供Content-Length请求头。
3.1.1. 压缩
您可以在 HTTP 客户端上启用压缩,这意味着请求头 Accept-Encoding 会被添加到请求头中。以下示例展示了如何做到这一点:
import reactor.netty.http.client.HttpClient;

public class Application {

	public static void main(String[] args) {
		HttpClient client =
				HttpClient.create()
				          .compress(true);

		client.get()
		      .uri("https://example.com/")
		      .response()
		      .block();
	}
}
3.1.2. 自动重定向支持
您可以配置 HTTP 客户端以启用自动重定向支持。
Reactor Netty 为自动重定向支持提供了两种不同的策略:
-
followRedirect(boolean):指定是否为状态码301|302|303|307|308启用 HTTP 自动重定向支持。当状态码为303时,重定向使用GET方法。 -
followRedirect(BiPredicate<HttpClientRequest, HttpClientResponse>):当所提供的谓词匹配时启用自动重定向支持。
以下示例使用 followRedirect(true):
import reactor.netty.http.client.HttpClient;

public class Application {

	public static void main(String[] args) {
		HttpClient client =
				HttpClient.create()
				          .followRedirect(true);

		client.get()
		      .uri("https://example.com/")
		      .response()
		      .block();
	}
}
4. 消费数据
要从给定的 HTTP 端点接收数据,您可以使用 HttpClient.ResponseReceiver 中的方法之一。以下示例使用 responseContent 方法:
import reactor.netty.http.client.HttpClient;

public class Application {

	public static void main(String[] args) {
		HttpClient client = HttpClient.create();

		client.get()
		      .uri("https://example.com/")
		      .responseContent() 1
		      .aggregate()       2
		      .asString()        3
		      .block();
	}
}
从给定的
HTTP端点接收数据聚合数据
将数据转换为字符串
4.1. 读取响应头与其他元数据
从给定的 HTTP 端点接收数据时,您可以检查响应头、状态码和其他元数据。您可以使用 HttpClientResponse 来获取这些额外的元数据。以下示例展示了如何做到这一点。
import reactor.netty.http.client.HttpClient;

public class Application {

	public static void main(String[] args) {
		HttpClient client = HttpClient.create();

		client.get()
		      .uri("https://example.com/")
		      .responseSingle((resp, bytes) -> {
		          System.out.println(resp.status()); 1
		          return bytes.asString();
		      })
		      .block();
	}
}
获取状态码。
4.2. HTTP 响应解码器
默认情况下,Netty 对传入的响应配置了一些限制,例如:
-
起始行的最大长度。
-
所有请求头的最大长度。
-
内容或每个数据块的最大长度。
有关更多信息,请参阅 HttpResponseDecoder
默认情况下,HTTP 客户端使用以下设置进行配置:
public static final int DEFAULT_MAX_INITIAL_LINE_LENGTH             = 4096;
	public static final int DEFAULT_MAX_HEADER_SIZE                     = 8192;
	/**
	 * Default max chunk size.
	 *
	 * @deprecated as of 1.1.0. This will be removed in 2.0.0 as Netty 5 does not support this configuration.
	 */
	@Deprecated
	public static final int DEFAULT_MAX_CHUNK_SIZE                      = 8192;
	public static final boolean DEFAULT_VALIDATE_HEADERS                = true;
	public static final int DEFAULT_INITIAL_BUFFER_SIZE                 = 128;
	public static final boolean DEFAULT_ALLOW_DUPLICATE_CONTENT_LENGTHS = false;
	public static final boolean DEFAULT_ALLOW_PARTIAL_CHUNKS            = true;
public static final boolean DEFAULT_FAIL_ON_MISSING_RESPONSE         = false;
	public static final boolean DEFAULT_PARSE_HTTP_AFTER_CONNECT_REQUEST = false;

	/**
	 * The maximum length of the content of the HTTP/2.0 clear-text upgrade request.
	 * By default, the client will allow an upgrade request with up to 65536 as
	 * the maximum length of the aggregated content.
	 */
	public static final int DEFAULT_H2C_MAX_CONTENT_LENGTH = 65536;
当您需要更改这些默认设置时,可以按如下方式配置 HTTP 客户端:
import reactor.netty.http.client.HttpClient;

public class Application {

	public static void main(String[] args) {
		HttpClient client =
				HttpClient.create()
				          .httpResponseDecoder(spec -> spec.maxHeaderSize(16384)); 1

		client.get()
		      .uri("https://example.com/")
		      .responseContent()
		      .aggregate()
		      .asString()
		      .block();
	}
}
所有请求头的最大长度将为
16384。当超过此值时,会抛出 TooLongFrameException。
5. 生命周期回调
提供了以下生命周期回调,以便您扩展 HttpClient。
| 回调 | 说明 |
|---|---|
doAfterRequest | 在请求发送后调用。 |
doAfterResolve | 在远程地址成功解析后调用。 |
doAfterResponseSuccess | 在响应完全接收后调用。 |
doOnChannelInit | 在初始化通道时调用。 |
doOnConnect | 在通道即将连接时调用。 |
doOnConnected | 在通道连接后调用。 |
doOnDisconnected | 在通道断开连接后调用。 |
doOnError | 在请求尚未发送、以及响应尚未完全接收时调用。 |
doOnRedirect | 在已接收响应头、且请求即将被重定向时调用。 |
doOnRequest | 在请求即将发送时调用。 |
doOnRequestError | 在请求尚未发送时调用。 |
doOnResolve | 在远程地址即将被解析时调用。 |
doOnResolveError | 在远程地址未能成功解析时调用。 |
doOnResponse | 在已接收响应头后调用。 |
doOnResponseError | 在响应尚未完全接收时调用。 |
以下示例使用 doOnConnected 和 doOnChannelInit 回调:
import io.netty.handler.logging.LoggingHandler;
import io.netty.handler.timeout.ReadTimeoutHandler;
import reactor.netty.http.client.HttpClient;
import java.util.concurrent.TimeUnit;

public class Application {

	public static void main(String[] args) {
		HttpClient client =
				HttpClient.create()
				          .doOnConnected(conn ->
				              conn.addHandlerFirst(new ReadTimeoutHandler(10, TimeUnit.SECONDS)))   1
				          .doOnChannelInit((observer, channel, remoteAddress) ->
				              channel.pipeline()
				                     .addFirst(new LoggingHandler("reactor.netty.examples")));      2

		client.get()
		      .uri("https://example.com/")
		      .response()
		      .block();
	}
}
通道连接后,
Netty管道会通过ReadTimeoutHandler进行扩展。初始化通道时,
Netty管道会通过LoggingHandler进行扩展。
6. TCP 级别配置
当您需要在 TCP 级别进行配置时,可以使用以下代码片段来扩展默认的 TCP 客户端配置(添加选项、绑定地址等):
import io.netty.channel.ChannelOption;
import io.netty.channel.epoll.EpollChannelOption;
//import io.netty.channel.socket.nio.NioChannelOption;
//import jdk.net.ExtendedSocketOptions;
import reactor.netty.http.client.HttpClient;
import java.net.InetSocketAddress;

public class Application {

	public static void main(String[] args) {
		HttpClient client =
				HttpClient.create()
				          .bindAddress(() -> new InetSocketAddress("host", 1234))
				          .option(ChannelOption.CONNECT_TIMEOUT_MILLIS, 10000) 1
				          .option(ChannelOption.SO_KEEPALIVE, true)            2
				          // The options below are available only when NIO transport (Java 11) is used
				          // on Mac or Linux (Java does not currently support these extended options on Windows)
				          // https://bugs.openjdk.java.net/browse/JDK-8194298
				          //.option(NioChannelOption.of(ExtendedSocketOptions.TCP_KEEPIDLE), 300)
				          //.option(NioChannelOption.of(ExtendedSocketOptions.TCP_KEEPINTERVAL), 60)
				          //.option(NioChannelOption.of(ExtendedSocketOptions.TCP_KEEPCOUNT), 8);
				          // The options below are available only when Epoll transport is used
				          .option(EpollChannelOption.TCP_KEEPIDLE, 300)        3
				          .option(EpollChannelOption.TCP_KEEPINTVL, 60)        4
				          .option(EpollChannelOption.TCP_KEEPCNT, 8);          5

		String response =
				client.get()
				      .uri("https://example.com/")
				      .responseContent()
				      .aggregate()
				      .asString()
				      .block();

		System.out.println("Response " + response);
	}
}
将连接建立超时配置为 10 秒。
启用 TCP
keepalive。这意味着当连接空闲一段时间后,TCP 开始发送keepalive探测。连接需要保持空闲 5 分钟,TCP 才开始发送
keepalive探测。将两次
keepalive探测之间的时间配置为 1 分钟。将 TCP
keepalive探测的最大次数配置为 8。
有关 TCP 级别配置的更多信息,请参阅 TCP Client。
6.1. 线路日志记录器
当需要检查对等方之间的流量时,Reactor Netty 提供了线路日志记录。默认情况下,线路日志记录是禁用的。要启用它,您必须将日志记录器 reactor.netty.http.client.HttpClient 的级别设置为 DEBUG,并应用以下配置:
import reactor.netty.http.client.HttpClient;

public class Application {

	public static void main(String[] args) {
		HttpClient client =
				HttpClient.create()
				          .wiretap(true); 1

		client.get()
		      .uri("https://example.com/")
		      .response()
		      .block();
	}
}
启用线路日志记录
6.1.1. 线路日志记录器格式化器
Reactor Netty 支持 3 种不同的格式化器:
/**
	 * When wire logging is enabled with this format, both events and content will be logged.
	 * The content will be in hex format.
	 * <p>Examples:</p>
	 * <pre>
	 * {@code
	 * reactor.netty.http.HttpTests - [d5230a14, L:/0:0:0:0:0:0:0:1:60267 - R:/0:0:0:0:0:0:0:1:60269] REGISTERED
	 * reactor.netty.http.HttpTests - [d5230a14, L:/0:0:0:0:0:0:0:1:60267 - R:/0:0:0:0:0:0:0:1:60269] ACTIVE
	 * reactor.netty.http.HttpTests - [d5230a14, L:/0:0:0:0:0:0:0:1:60267 - R:/0:0:0:0:0:0:0:1:60269] READ: 145B
	 *          +-------------------------------------------------+
	 *          |  0  1  2  3  4  5  6  7  8  9  a  b  c  d  e  f |
	 * +--------+-------------------------------------------------+----------------+
	 * |00000000| 50 4f 53 54 20 2f 74 65 73 74 2f 57 6f 72 6c 64 |POST /test/World|
	 * |00000010| 20 48 54 54 50 2f 31 2e 31 0d 0a 43 6f 6e 74 65 | HTTP/1.1..Conte|
	 * |00000020| 6e 74 2d 54 79 70 65 3a 20 74 65 78 74 2f 70 6c |nt-Type: text/pl|
	 * |00000030| 61 69 6e 0d 0a 75 73 65 72 2d 61 67 65 6e 74 3a |ain..user-agent:|
	 * |00000040| 20 52 65 61 63 74 6f 72 4e 65 74 74 79 2f 64 65 | ReactorNetty/de|
	 * ...
	 * reactor.netty.http.HttpTests - [d5230a14, L:/0:0:0:0:0:0:0:1:60267 - R:/0:0:0:0:0:0:0:1:60269] WRITE: 38B
	 *          +-------------------------------------------------+
	 *          |  0  1  2  3  4  5  6  7  8  9  a  b  c  d  e  f |
	 * +--------+-------------------------------------------------+----------------+
	 * |00000000| 48 54 54 50 2f 31 2e 31 20 32 30 30 20 4f 4b 0d |HTTP/1.1 200 OK.|
	 * |00000010| 0a 63 6f 6e 74 65 6e 74 2d 6c 65 6e 67 74 68 3a |.content-length:|
	 * |00000020| 20 30 0d 0a 0d 0a                               | 0....          |
	 * +--------+-------------------------------------------------+----------------+
	 * }
	 * </pre>
	 */
/**
	 * When wire logging is enabled with this format, only the events will be logged.
	 * <p>Examples:</p>
	 * <pre>
	 * {@code
	 * reactor.netty.http.HttpTests - [230d3686, L:/0:0:0:0:0:0:0:1:60241 - R:/0:0:0:0:0:0:0:1:60245] REGISTERED
	 * reactor.netty.http.HttpTests - [230d3686, L:/0:0:0:0:0:0:0:1:60241 - R:/0:0:0:0:0:0:0:1:60245] ACTIVE
	 * reactor.netty.http.HttpTests - [230d3686, L:/0:0:0:0:0:0:0:1:60241 - R:/0:0:0:0:0:0:0:1:60245] READ: 145B
	 * reactor.netty.http.HttpTests - [230d3686, L:/0:0:0:0:0:0:0:1:60241 - R:/0:0:0:0:0:0:0:1:60245] WRITE: 38B
	 * }
	 * </pre>
	 */
/**
	 * When wire logging is enabled with this format, both events and content will be logged.
	 * The content will be in plain text format.
	 * <p>Examples:</p>
	 * <pre>
	 * {@code
	 * reactor.netty.http.HttpTests - [02c3db6c, L:/0:0:0:0:0:0:0:1:60317 - R:/0:0:0:0:0:0:0:1:60319] REGISTERED
	 * reactor.netty.http.HttpTests - [02c3db6c, L:/0:0:0:0:0:0:0:1:60317 - R:/0:0:0:0:0:0:0:1:60319] ACTIVE
	 * reactor.netty.http.HttpTests - [02c3db6c, L:/0:0:0:0:0:0:0:1:60317 - R:/0:0:0:0:0:0:0:1:60319] READ: 145B POST /test/World HTTP/1.1
	 * Content-Type: text/plain
	 * user-agent: ReactorNetty/dev
	 * ...
	 * reactor.netty.http.HttpTests - [02c3db6c, L:/0:0:0:0:0:0:0:1:60317 - R:/0:0:0:0:0:0:0:1:60319] WRITE: 38B HTTP/1.1 200 OK
	 * content-length: 0
	 * }
	 * </pre>
	 */
当您需要更改默认格式化器时,可以按如下方式进行配置:
import io.netty.handler.logging.LogLevel;
import reactor.netty.http.client.HttpClient;
import reactor.netty.transport.logging.AdvancedByteBufFormat;

public class Application {

	public static void main(String[] args) {
		HttpClient client =
				HttpClient.create()
				          .wiretap("logger-name", LogLevel.DEBUG, AdvancedByteBufFormat.TEXTUAL); 1

		client.get()
		      .uri("https://example.com/")
		      .response()
		      .block();
	}
}
启用线路日志记录,并使用 AdvancedByteBufFormat#TEXTUAL 来打印内容。
6.2. 事件循环组
默认情况下,Reactor Netty 使用一个“事件循环组”,其中工作线程的数量等于初始化时运行时可用的处理器数量(但最小值为 4)。这个“事件循环组”在同一个 JVM 中的所有服务器和客户端之间共享。当您需要不同的配置时,可以使用 LoopResources#create 方法之一。
以下清单展示了事件循环组的默认配置:
/**
	 * Default worker thread count, fallback to available processor
	 * (but with a minimum value of 4).
	 */
	public static final String IO_WORKER_COUNT = "reactor.netty.ioWorkerCount";
	/**
	 * Default selector thread count, fallback to -1 (no selector thread)
	 * <p><strong>Note:</strong> In most use cases using a worker thread also as a selector thread works well.
	 * A possible use case for specifying a separate selector thread might be when the worker threads are too busy
	 * and connections cannot be accepted fast enough.
	 * <p><strong>Note:</strong> Although more than 1 can be configured as a selector thread count, in reality
	 * only 1 thread will be used as a selector thread.
	 */
	public static final String IO_SELECT_COUNT = "reactor.netty.ioSelectCount";
	/**
	 * Default worker thread count for UDP, fallback to available processor
	 * (but with a minimum value of 4).
	 */
	public static final String UDP_IO_THREAD_COUNT = "reactor.netty.udp.ioThreadCount";
	/**
	 * Default quiet period that guarantees that the disposal of the underlying LoopResources
	 * will not happen, fallback to 2 seconds.
	 */
	public static final String SHUTDOWN_QUIET_PERIOD = "reactor.netty.ioShutdownQuietPeriod";
	/**
	 * Default maximum amount of time to wait until the disposal of the underlying LoopResources
	 * regardless if a task was submitted during the quiet period, fallback to 15 seconds.
	 */
	public static final String SHUTDOWN_TIMEOUT = "reactor.netty.ioShutdownTimeout";

	/**
	 * Default value whether the native transport (epoll, io_uring, kqueue) will be preferred,
	 * fallback it will be preferred when available.
	 * <p><strong>Note:</strong> On {@code Linux}, {@code Epoll} will be preferred by default.
	 * If {@code IO_Uring} needs to be configured, a dependency to {@code io.netty:netty-transport-native-io_uring}
	 * has to be added.
	 */
	public static final String NATIVE = "reactor.netty.native";
如果您需要更改这些设置,可以应用以下配置:
import reactor.netty.http.client.HttpClient;
import reactor.netty.resources.LoopResources;

public class Application {

	public static void main(String[] args) {
		LoopResources loop = LoopResources.create("event-loop", 1, 4, true);
		HttpClient client =
				HttpClient.create()
				          .runOn(loop);

		client.get()
		      .uri("https://example.com/")
		      .responseContent()
		      .aggregate()
		      .asString()
		      .block();
	}
}
6.2.1. 释放事件循环组
- 如果您使用 Reactor Netty 提供的默认
Event Loop Group,请调用 HttpResources#disposeLoopsAndConnections/#disposeLoopsAndConnectionsLater方法。
释放 HttpResources 意味着正在使用它的每个服务器/客户端都将无法再使用它!
- 如果您使用自定义的
LoopResources,请调用 LoopResources#dispose/#disposeLater方法。
释放自定义 LoopResources 意味着每个被配置为使用它的服务器/客户端都将无法再使用它!
7. 连接池
默认情况下,HttpClient(HttpClient.create())使用共享的 ConnectionProvider。该 ConnectionProvider 被配置为针对每个远程主机(远程主机指主机名及其关联端口号的组合)创建一个“固定”连接池,并具有以下配置:
-
500作为活动通道的最大数量 -
1000作为允许保持挂起状态的额外通道获取尝试的最大数量 -
其余配置均为默认值(请参阅下面的系统属性或构建器配置)
这意味着,只要创建并由池管理的通道少于 500,当有人尝试获取通道时,实现就会创建一个新通道。当池中的通道数量达到最大值时,最多 1000 个新的通道获取尝试会被延迟(挂起),直到有通道被归还到池中,再往后的尝试会因错误而被拒绝。
/**
	 * Default max connections. Fallback to
	 * 2 * available number of processors (but with a minimum value of 16)
	 */
	public static final String POOL_MAX_CONNECTIONS = "reactor.netty.pool.maxConnections";
	/**
	 * Default acquisition timeout (milliseconds) before error. If -1 will never wait to
	 * acquire before opening a new
	 * connection in an unbounded fashion. Fallback 45 seconds
	 */
	public static final String POOL_ACQUIRE_TIMEOUT = "reactor.netty.pool.acquireTimeout";
	/**
	 * Default max idle time, fallback - max idle time is not specified.
	 * <p><strong>Note:</strong> This configuration is not applicable for {@link reactor.netty.tcp.TcpClient}.
	 * A TCP connection is always closed and never returned to the pool.
	 */
	public static final String POOL_MAX_IDLE_TIME = "reactor.netty.pool.maxIdleTime";
	/**
	 * Default max life time, fallback - max life time is not specified.
	 * <p><strong>Note:</strong> This configuration is not applicable for {@link reactor.netty.tcp.TcpClient}.
	 * A TCP connection is always closed and never returned to the pool.
	 */
	public static final String POOL_MAX_LIFE_TIME = "reactor.netty.pool.maxLifeTime";
	/**
	 * Default leasing strategy (fifo, lifo), fallback to fifo.
	 * <ul>
	 *     <li>fifo - The connection selection is first in, first out</li>
	 *     <li>lifo - The connection selection is last in, first out</li>
	 * </ul>
	 * <p><strong>Note:</strong> This configuration is not applicable for {@link reactor.netty.tcp.TcpClient}.
	 * A TCP connection is always closed and never returned to the pool.
	 */
	public static final String POOL_LEASING_STRATEGY = "reactor.netty.pool.leasingStrategy";
	/**
	 * Default {@code getPermitsSamplingRate} (between 0d and 1d (percentage))
	 * to be used with a {@link SamplingAllocationStrategy}.
	 * This strategy wraps a {@link PoolBuilder#sizeBetween(int, int) sizeBetween} {@link AllocationStrategy}
	 * and samples calls to {@link AllocationStrategy#getPermits(int)}.
	 * Fallback - sampling is not enabled.
	 */
	public static final String POOL_GET_PERMITS_SAMPLING_RATE = "reactor.netty.pool.getPermitsSamplingRate";
	/**
	 * Default {@code returnPermitsSamplingRate} (between 0d and 1d (percentage))
	 * to be used with a {@link SamplingAllocationStrategy}.
	 * This strategy wraps a {@link PoolBuilder#sizeBetween(int, int) sizeBetween} {@link AllocationStrategy}
	 * and samples calls to {@link AllocationStrategy#returnPermits(int)}.
	 * Fallback - sampling is not enabled.
	 */
	public static final String POOL_RETURN_PERMITS_SAMPLING_RATE = "reactor.netty.pool.returnPermitsSamplingRate";
当您需要更改默认设置时,可以按如下方式配置 ConnectionProvider:
import reactor.netty.http.client.HttpClient;
import reactor.netty.resources.ConnectionProvider;

import java.time.Duration;

public class Application {

	public static void main(String[] args) {
		ConnectionProvider provider =
				ConnectionProvider.builder("custom")
				                  .maxConnections(50)
				                  .maxIdleTime(Duration.ofSeconds(20))           1
				                  .maxLifeTime(Duration.ofSeconds(60))           2
				                  .pendingAcquireTimeout(Duration.ofSeconds(60)) 3
				                  .evictInBackground(Duration.ofSeconds(120))    4
				                  .build();

		HttpClient client = HttpClient.create(provider);

		String response =
				client.get()
				      .uri("https://example.com/")
				      .responseContent()
				      .aggregate()
				      .asString()
				      .block();

		System.out.println("Response " + response);

		provider.disposeLater()
		        .block();
	}
}
将连接保持空闲的最长时间配置为 20 秒。
将连接保持存活的最长时间配置为 60 秒。
将挂起获取操作的最长时间配置为 60 秒。
每隔两分钟,会定期检查连接池中适合移除的连接。
请注意,只有默认的 HttpClient(HttpClient.create())才使用 500 作为活动通道的最大数量。在上面的示例中,实例化自定义 ConnectionProvider 时,我们通过 maxConnections 将此值更改为 50。此外,如果您不设置此参数,则使用默认的 maxConnections(2 * 可用处理器数量)。
以下清单展示了可用的配置:
| 配置名称 | 说明 |
|---|---|
disposeInactivePoolsInBackground | 启用此选项后,会在后台定期检查连接池,其中那些为空且已空闲指定时间的连接池将可被释放。当没有活动连接、空闲连接和挂起获取时,连接池被视为为空。默认情况下,这种对非活动连接池的后台释放是禁用的。 |
disposeTimeout | 当调用 ConnectionProvider#dispose() 或 ConnectionProvider#disposeLater() 时,按此宽限期超时触发连接池的优雅关闭。此后,所有获取连接的调用都会快速失败并抛出异常。不过,在所提供的 Duration 内,挂起的获取仍有机会被满足。注意:拒绝新的获取以及宽限期计时会立即开始,无论是否订阅 ConnectionProvider#disposeLater() 返回的 Mono。后续调用会返回同一个 Mono,即实际从第一次优雅关闭调用获取通知,并忽略后续提供的超时。默认情况下,不指定释放超时。 |
evictInBackground | 启用此选项后,每个连接池都会定期检查是否有符合 maxIdleTime 等驱逐条件、适合移除的连接。默认情况下,这种后台驱逐是禁用的。 |
fifo | 配置连接池,使得当存在空闲连接(即池未被充分利用)时,下一次获取操作会获得 最近最少使用 的连接(LRU,即在当前空闲连接中最先被释放的连接)。默认的租用策略。 |
lifo | 配置连接池,使得当存在空闲连接(即池未被充分利用)时,下一次获取操作会获得 最近最多使用 的连接(MRU,即在当前空闲连接中最后被释放的连接)。 |
maxConnections | (每个连接池)在开始挂起之前的最大连接数。默认为 2 * 可用处理器数量(但最小值为 16)。 |
maxIdleTime | 通道在空闲后可被关闭的时间(精度:毫秒)。默认:不指定最大空闲时间。 |
maxLifeTime | 通道可被关闭的总存活时间(精度:毫秒)。默认:不指定最大存活时间。 |
metrics | 启用/禁用与 Micrometer 的内置集成。可以提供 ConnectionProvider.MeterRegistrar 以与其他指标系统集成。默认情况下,不启用指标。 |
pendingAcquireMaxCount | 在挂起队列中保留的额外获取连接尝试的最大数量。如果指定为 -1,则挂起队列没有上限。默认为 2 * 最大连接数。 |
pendingAcquireTimeout | 挂起获取必须完成的最长时间,否则会抛出 TimeoutException(精度:毫秒)。如果指定为 -1,则不应用此超时。默认:45 秒。 |
当您预期会有高负载时,请谨慎为连接池设置非常高的最大连接数。由于打开/获取的并发连接过多,您可能会遇到根因为 "Connect Timeout" 的 reactor.netty.http.client.PrematureCloseException 异常。
如果您需要禁用连接池,可以应用以下配置:
import reactor.netty.http.client.HttpClient;

public class Application {

	public static void main(String[] args) {
		HttpClient client =
				HttpClient.newConnection()
				          .doOnConnected(conn -> System.out.println("Connection " + conn.channel()));

		String response =
				// A new connection is established for every request
				client.get()
				      .uri("https://httpbin.org/get")
				      .responseContent()
				      .aggregate()
				      .asString()
				      .block();

		System.out.println("Response " + response);

		response =
				// A new connection is established for every request
				client.post()
				      .uri("https://httpbin.org/post")
				      .responseContent()
				      .aggregate()
				      .asString()
				      .block();

		System.out.println("Response " + response);
	}
}
7.1. 释放连接池
- 如果您使用 Reactor Netty 提供的默认
ConnectionProvider,请调用 HttpResources#disposeLoopsAndConnections/#disposeLoopsAndConnectionsLater方法。
释放 HttpResources 意味着正在使用它的每个客户端都将无法再使用它!
- 如果您使用自定义的
ConnectionProvider,请调用 ConnectionProvider#dispose/#disposeLater/#disposeWhen方法。
释放自定义 ConnectionProvider 意味着每个被配置为使用它的客户端都将无法再使用它!
7.2. 指标
带池的 ConnectionProvider 支持与 Micrometer 的内置集成。它暴露的所有指标都带有前缀 reactor.netty.connection.provider。
带池 ConnectionProvider 指标
| 指标名称 | 类型 | 说明 |
|---|---|---|
| reactor.netty.connection.provider.total.connections | Gauge | 所有连接的数量,包括活动的和空闲的。请参阅 Total Connections |
| reactor.netty.connection.provider.active.connections | Gauge | 已成功获取并正在使用的连接数量。请参阅 Active Connections |
| reactor.netty.connection.provider.max.connections | Gauge | 允许的最大活动连接数。请参阅 Max Connections |
| reactor.netty.connection.provider.idle.connections | Gauge | 空闲连接的数量。请参阅 Idle Connections |
| reactor.netty.connection.provider.pending.connections | Gauge | 正在等待连接的请求数量。请参阅 Pending Connections |
| reactor.netty.connection.provider.pending.connections.time | Timer | 从连接池挂起获取连接所花费的时间。请参阅 Pending Connections Time |
| reactor.netty.connection.provider.max.pending.connections | Gauge | 在等待可用连接时将排队的最大请求数量。请参阅 Max Pending Connections |
下表提供了 HTTP 客户端在配置为服务 HTTP/2 流量时的指标信息:
| 指标名称 | 类型 | 说明 |
|---|---|---|
| reactor.netty.connection.provider.active.streams | Gauge | 活动 HTTP/2 流的数量。请参阅 Active Streams |
| reactor.netty.connection.provider.pending.streams | Gauge | 正在等待打开 HTTP/2 流的请求数量。请参阅 Pending Streams |
以下示例启用了该集成:
import reactor.netty.http.client.HttpClient;
import reactor.netty.resources.ConnectionProvider;

public class Application {

	public static void main(String[] args) {
		ConnectionProvider provider =
				ConnectionProvider.builder("custom")
				                  .maxConnections(50)
				                  .metrics(true) 1
				                  .build();

		HttpClient client = HttpClient.create(provider);

		String response =
				client.get()
				      .uri("https://example.com/")
				      .responseContent()
				      .aggregate()
				      .asString()
				      .block();

		System.out.println("Response " + response);

		provider.disposeLater()
		        .block();
	}
}
启用与 Micrometer 的内置集成
当需要将 HTTP 客户端指标与 Micrometer 之外的系统集成,或者您想提供自己的 Micrometer 集成时,可以按如下方式提供自己的指标。
以下 HTTP 示例启用了该集成:
public class Application {

	public static void main(String[] args) {
		AtomicReference<ConnectionPoolMetrics> metrics = new AtomicReference<>();

		ConnectionProvider provider =
				ConnectionProvider.builder("custom")
				                  .maxConnections(50)
				                  .metrics(true, () -> new CustomHttpMeterRegistrar(metrics)) 1
				                  .build();

		HttpClient client = HttpClient.create(provider);

		String response =
				client.get()
				      .uri("https://example.com/")
				      .responseContent()
				      .aggregate()
				      .asString()
				      .block();

		System.out.println("Response " + response);
		System.out.println("Acquired size " + metrics.get().acquiredSize());
		System.out.println("Idle size " + metrics.get().idleSize());
		System.out.println("Pending size " + metrics.get().pendingAcquireSize());

		provider.disposeLater()
		        .block();
	}

	static final class CustomHttpMeterRegistrar implements ConnectionProvider.MeterRegistrar {
		AtomicReference<ConnectionPoolMetrics> metrics;

		CustomHttpMeterRegistrar(AtomicReference<ConnectionPoolMetrics> metrics) {
			this.metrics = metrics;
		}

		@Override
		public void registerMetrics(String poolName, String id, SocketAddress remoteAddress, ConnectionPoolMetrics metrics) { 2
			this.metrics.set(metrics);
		}

		@Override
		public void deRegisterMetrics(String poolName, String id, SocketAddress remoteAddress) { 3
			// no op
		}
	}
}
启用
HTTP连接池指标,并提供ConnectionProvider.MeterRegistrar实现。在为
HTTP连接池注册指标时调用。在为
HTTP连接池注销指标时调用。
以下 HTTP2、H2C、HTTP3 示例启用了该集成:
public class Application {

	public static void main(String[] args) {
		AtomicReference<HttpConnectionPoolMetrics> metrics = new AtomicReference<>();

		ConnectionProvider provider =
				ConnectionProvider.builder("custom")
				                  .maxConnections(50)
				                  .metrics(true, () -> new CustomHttp2MeterRegistrar(metrics)) 1
				                  .build();

		HttpClient client = HttpClient.create(provider).protocol(HttpProtocol.H2);

		String response =
				client.get()
				      .uri("https://example.com/")
				      .responseContent()
				      .aggregate()
				      .asString()
				      .block();

		System.out.println("Response " + response);
		System.out.println("Active stream size " + metrics.get().activeStreamSize());
		System.out.println("Pending stream size " + metrics.get().pendingAcquireSize());

		provider.disposeLater()
		        .block();
	}

	static final class CustomHttp2MeterRegistrar extends HttpMeterRegistrarAdapter {
		AtomicReference<HttpConnectionPoolMetrics> metrics;

		CustomHttp2MeterRegistrar(AtomicReference<HttpConnectionPoolMetrics> metrics) {
			this.metrics = metrics;
		}

		@Override
		public void registerMetrics(String poolName, String id, SocketAddress remoteAddress, HttpConnectionPoolMetrics metrics) { 2
			this.metrics.set(metrics);
		}

		@Override
		public void deRegisterMetrics(String poolName, String id, SocketAddress remoteAddress) { 3
			// no op
		}
	}
}
启用
HTTP2、H2C、HTTP3连接池指标,并提供HttpMeterRegistrarAdapter实现。在为
HTTP2、H2C、HTTP3连接池注册指标时调用。在为
HTTP2、H2C、HTTP3连接池注销指标时调用。
8. SSL 与 TLS
当您需要 SSL 或 TLS 时,可以应用下例所示的配置。默认情况下,如果 OpenSSL 可用,则使用 SslProvider.OPENSSL 提供器;否则使用 SslProvider.JDK 提供器。您可以使用 SslContextBuilder 或通过设置 -Dio.netty.handler.ssl.noOpenSsl=true 来切换提供器。以下示例使用 SslContextBuilder:
import reactor.netty.http.Http11SslContextSpec;
import reactor.netty.http.client.HttpClient;

public class Application {

	public static void main(String[] args) {
		Http11SslContextSpec http11SslContextSpec = Http11SslContextSpec.forClient();

		HttpClient client =
				HttpClient.create()
				          .secure(spec -> spec.sslContext(http11SslContextSpec));

		client.get()
		      .uri("https://example.com/")
		      .response()
		      .block();
	}
}
8.1. 服务器名称指示
默认情况下,HTTP 客户端会将远程主机名作为 SNI 服务器名称发送。当您需要更改此默认设置时,可以按如下方式配置 HTTP 客户端:
import io.netty.handler.ssl.SslContext;
import io.netty.handler.ssl.SslContextBuilder;
import reactor.netty.http.client.HttpClient;

import javax.net.ssl.SNIHostName;

public class Application {

	public static void main(String[] args) throws Exception {
		SslContext sslContext = SslContextBuilder.forClient().build();

		HttpClient client =
				HttpClient.create()
				          .secure(spec -> spec.sslContext(sslContext)
				                              .serverNames(new SNIHostName("test.com")));

		client.get()
		      .uri("https://127.0.0.1:8080/")
		      .response()
		      .block();
	}
}
9. 重试策略
默认情况下,如果请求在 TCP 级别被中止,HTTP 客户端会重试一次该请求。
10. HTTP/2
默认情况下,HTTP 客户端支持 HTTP/1.1。如果您需要 HTTP/2,可以通过配置获得。除协议配置外,如果您需要 H2 但不需要 H2C(明文),还必须配置 SSL。
由于 JDK8“开箱即用”并不支持应用层协议协商(ALPN)(尽管有些厂商已将 ALPN 移植回 JDK8),您需要额外依赖一个支持它的本地库——例如 netty-tcnative-boringssl-static。
以下清单展示了一个简单的 H2 示例:
import io.netty.handler.codec.http.HttpHeaders;
import reactor.core.publisher.Mono;
import reactor.netty.http.HttpProtocol;
import reactor.netty.http.client.HttpClient;
import reactor.util.function.Tuple2;

public class H2Application {

	public static void main(String[] args) {
		HttpClient client =
				HttpClient.create()
				          .protocol(HttpProtocol.H2) 1
				          .secure();                 2

		Tuple2<String, HttpHeaders> response =
				client.get()
				      .uri("https://example.com/")
				      .responseSingle((res, bytes) -> bytes.asString()
				                                           .zipWith(Mono.just(res.responseHeaders())))
				      .block();

		System.out.println("Used stream ID: " + response.getT2().get("x-http2-stream-id"));
		System.out.println("Response: " + response.getT1());
	}
}
配置客户端仅支持
HTTP/2配置
SSL
以下清单展示了一个简单的 H2C 示例:
import io.netty.handler.codec.http.HttpHeaders;
import reactor.core.publisher.Mono;
import reactor.netty.http.HttpProtocol;
import reactor.netty.http.client.HttpClient;
import reactor.util.function.Tuple2;

public class H2CApplication {

	public static void main(String[] args) {
		HttpClient client =
				HttpClient.create()
				          .protocol(HttpProtocol.H2C);

		Tuple2<String, HttpHeaders> response =
				client.get()
				      .uri("http://localhost:8080/")
				      .responseSingle((res, bytes) -> bytes.asString()
				                                           .zipWith(Mono.just(res.responseHeaders())))
				      .block();

		System.out.println("Used stream ID: " + response.getT2().get("x-http2-stream-id"));
		System.out.println("Response: " + response.getT1());
	}
}
10.1. 协议选择
/**
	 * The default supported HTTP protocol by HttpServer and HttpClient.
	 */
	HTTP11,

	/**
	 * HTTP/2.0 support with TLS
	 * <p>If used along with HTTP/1.1 protocol, HTTP/2.0 will be the preferred protocol.
	 * While negotiating the application level protocol, HTTP/2.0 or HTTP/1.1 can be chosen.
	 * <p>If used without HTTP/1.1 protocol, HTTP/2.0 will always be offered as a protocol
	 * for communication with no fallback to HTTP/1.1.
	 */
	H2,

	/**
	 * HTTP/2.0 support with clear-text.
	 * <p>If used along with HTTP/1.1 protocol, will support H2C "upgrade":
	 * Request or consume requests as HTTP/1.1 first, looking for HTTP/2.0 headers
	 * and {@literal Connection: Upgrade}. A server will typically reply a successful
	 * 101 status if upgrade is successful or a fallback HTTP/1.1 response. When
	 * successful the client will start sending HTTP/2.0 traffic.
	 * <p>If used without HTTP/1.1 protocol, will support H2C "prior-knowledge": Doesn't
	 * require {@literal Connection: Upgrade} handshake between a client and server but
	 * fallback to HTTP/1.1 will not be supported.
	 */
	H2C,

	/**
	 * HTTP/3.0 support.
	 * @since 1.2.0
	 */
	HTTP3
}
11. HTTP/3
默认情况下,HTTP 客户端支持 HTTP/1.1。如果您需要 HTTP/3,可以通过配置获得。除协议配置外,您还需要添加对 io.netty:netty-codec-native-quic 的依赖。
以下清单展示了一个简单的 HTTP3 示例:
import io.netty.handler.codec.http.HttpHeaders;
import reactor.core.publisher.Mono;
import reactor.netty.http.HttpProtocol;
import reactor.netty.http.client.HttpClient;
import reactor.util.function.Tuple2;

import java.time.Duration;

public class Application {

	public static void main(String[] args) throws Exception {
		HttpClient client =
				HttpClient.create()
				          .protocol(HttpProtocol.HTTP3)                                  1
				          .http3Settings(spec -> spec.idleTimeout(Duration.ofSeconds(5)) 2
				                                     .maxData(10000000)
				                                     .maxStreamDataBidirectionalLocal(1000000));

		Tuple2<String, HttpHeaders> response =
				client.get()
				      .uri("https://www.google.com/")
				      .responseSingle((res, bytes) -> bytes.asString()
				                                           .zipWith(Mono.just(res.responseHeaders())))
				      .block();

		System.out.println("Used stream ID: " + response.getT2().get("x-http3-stream-id"));
		System.out.println("Response: " + response.getT1());
	}
}
配置客户端仅支持
HTTP/3配置
HTTP/3设置
12. 代理支持
Reactor Netty 支持 Netty 提供的代理功能,并提供了通过 ProxyProvider 构建器来指定 non proxy hosts(非代理主机)的方式。
无论使用 http 还是 https 方案,Netty 的 HTTP 代理支持始终使用 CONNECT 方法,以便与指定的代理建立隧道。(更多信息:Netty enforce HTTP proxy to support HTTP CONNECT method)。有些代理在方案为 http 时可能不支持 CONNECT 方法,或者可能需要进行配置才能支持这种通信方式。有时这可能就是无法连接到代理的原因。请查阅代理文档,确认它是否支持 CONNECT 方法,或是否需要额外配置才能支持该方法。
以下示例使用 ProxyProvider:
import reactor.netty.http.client.HttpClient;
import reactor.netty.transport.ProxyProvider;

public class Application {

	public static void main(String[] args) {
		HttpClient client =
				HttpClient.create()
				          .proxy(spec -> spec.type(ProxyProvider.Proxy.HTTP)
				                             .host("proxy")
				                             .port(8080)
				                             .nonProxyHosts("localhost")
				                             .connectTimeoutMillis(20_000)); 1

		String response =
				client.get()
				      .uri("https://example.com/")
				      .responseContent()
				      .aggregate()
				      .asString()
				      .block();

		System.out.println("Response " + response);
	}
}
将连接建立超时配置为 20 秒。
proxyWhen(…) 方法允许进行动态代理配置。
-
proxyWhen(…)接收一个HttpClientConfig,并允许为每个单独的 HTTP 请求设置代理,从而可以根据请求灵活地选择不同的代理。 -
一旦使用
proxyWhen(…)设置了代理,之前通过proxy(…)或noProxy()设置的任何代理都将被忽略。github.com/reactor/reactor-netty/tree/main/reactor-netty-examples/src/main/java/reactor/netty/examples/documentation/http/client/proxy/deferred/Application.java
import reactor.core.publisher.Mono;
import reactor.netty.http.client.HttpClient;
import reactor.netty.transport.ProxyProvider;

public class Application {

	public static void main(String[] args) {
		HttpClient client =
				HttpClient.create()
				          .proxyWhen((httpClientConfig, spec) -> {    // only applied
				              if (httpClientConfig.uri().startsWith("https://example.com")) {
				                  return Mono.justOrEmpty(
				                          spec.type(ProxyProvider.Proxy.HTTP)
				                              .host("proxy")
				                              .port(8080)
				                              .nonProxyHosts("localhost")
				                              .connectTimeoutMillis(20_000));
				              }

				              return Mono.empty();
				          })
				          .proxy(spec -> spec.type(ProxyProvider.Proxy.HTTP)
				                             .host("ignored-proxy-domain")
				                             .port(9000)
				                             .connectTimeoutMillis(20_000))   // ignored
				          .noProxy(); // ignored

		String response =
				client.get()
				      .uri("https://example.com/")
				      .responseContent()
				      .aggregate()
				      .asString()
				      .block();

		System.out.println("Response " + response);
	}
}
13. 指标
HTTP 客户端支持与 Micrometer 的内置集成。它暴露的所有指标都带有前缀 reactor.netty.http.client。
下表提供了 HTTP 客户端的指标信息:
| 指标名称 | 类型 | 说明 |
|---|---|---|
| reactor.netty.http.client.data.received | DistributionSummary | 接收的数据量,以字节为单位。请参阅 Data Received |
| reactor.netty.http.client.data.sent | DistributionSummary | 发送的数据量,以字节为单位。请参阅 Data Sent |
| reactor.netty.http.client.errors | Counter | 发生的错误数量。请参阅 Errors Count |
| reactor.netty.http.client.tls.handshake.time | Timer | TLS 握手所花费的时间。请参阅 Tls Handshake Time |
| reactor.netty.http.client.connect.time | Timer | 连接到远程地址所花费的时间。请参阅 Connect Time |
| reactor.netty.http.client.address.resolver | Timer | 解析地址所花费的时间。请参阅 Hostname Resolution Time |
| reactor.netty.http.client.data.received.time | Timer | 消费传入数据所花费的时间。请参阅 Http Client Data Received Time |
| reactor.netty.http.client.data.sent.time | Timer | 发送传出数据所花费的时间。请参阅 Http Client Data Sent Time |
| reactor.netty.http.client.response.time | Timer | 请求/响应的总时间。请参阅 Http Client Response Time |
以下附加指标同样可用:
带池 ConnectionProvider 指标
| 指标名称 | 类型 | 说明 |
|---|---|---|
| reactor.netty.connection.provider.total.connections | Gauge | 所有连接的数量,包括活动的和空闲的。请参阅 Total Connections |
| reactor.netty.connection.provider.active.connections | Gauge | 已成功获取并正在使用的连接数量。请参阅 Active Connections |
| reactor.netty.connection.provider.max.connections | Gauge | 允许的最大活动连接数。请参阅 Max Connections |
| reactor.netty.connection.provider.idle.connections | Gauge | 空闲连接的数量。请参阅 Idle Connections |
| reactor.netty.connection.provider.pending.connections | Gauge | 正在等待连接的请求数量。请参阅 Pending Connections |
| reactor.netty.connection.provider.pending.connections.time | Timer | 从连接池挂起获取连接所花费的时间。请参阅 Pending Connections Time |
| reactor.netty.connection.provider.max.pending.connections | Gauge | 在等待可用连接时将排队的最大请求数量。请参阅 Max Pending Connections |
下表提供了 HTTP 客户端在配置为服务 HTTP/2 流量时的指标信息:
| 指标名称 | 类型 | 说明 |
|---|---|---|
| reactor.netty.connection.provider.active.streams | Gauge | 活动 HTTP/2 流的数量。请参阅 Active Streams |
| reactor.netty.connection.provider.pending.streams | Gauge | 正在等待打开 HTTP/2 流的请求数量。请参阅 Pending Streams |
ByteBufAllocator 指标
| 指标名称 | 类型 | 说明 |
|---|---|---|
| reactor.netty.bytebuf.allocator.used.heap.memory | Gauge | 堆缓冲分配器预留的字节数。请参阅 Used Heap Memory |
| reactor.netty.bytebuf.allocator.used.direct.memory | Gauge | 直接缓冲分配器预留的字节数。请参阅 Used Direct Memory |
| reactor.netty.bytebuf.allocator.heap.arenas | Gauge | 堆 arena 的数量(使用 PooledByteBufAllocator 时)。请参阅 Heap Arenas |
| reactor.netty.bytebuf.allocator.direct.arenas | Gauge | 直接 arena 的数量(使用 PooledByteBufAllocator 时)。请参阅 Direct Arenas |
| reactor.netty.bytebuf.allocator.threadlocal.caches | Gauge | 线程本地缓存的数量(使用 PooledByteBufAllocator 时)。请参阅 Thread Local Caches |
| reactor.netty.bytebuf.allocator.small.cache.size | Gauge | 小缓存的大小(使用 PooledByteBufAllocator 时)。请参阅 Small Cache Size |
| reactor.netty.bytebuf.allocator.normal.cache.size | Gauge | 普通缓存的大小(使用 PooledByteBufAllocator 时)。请参阅 Normal Cache Size |
| reactor.netty.bytebuf.allocator.chunk.size | Gauge | 一个 arena 的数据块大小(使用 PooledByteBufAllocator 时)。请参阅 Chunk Size |
| reactor.netty.bytebuf.allocator.active.heap.memory | Gauge | 从堆缓冲池分配的在用缓冲实际消耗的字节数(使用 PooledByteBufAllocator 时)。请参阅 Active Heap Memory |
| reactor.netty.bytebuf.allocator.active.direct.memory | Gauge | 从直接缓冲池分配的在用缓冲实际消耗的字节数(使用 PooledByteBufAllocator 时)。请参阅 Active Direct Memory |
EventLoop 指标
| 指标名称 | 类型 | 说明 |
|---|---|---|
| reactor.netty.eventloop.pending.tasks | Gauge | 在事件循环上等待处理的任务数量。请参阅 Pending Tasks |
以下示例启用了该集成:
import io.micrometer.core.instrument.Metrics;
import io.micrometer.core.instrument.config.MeterFilter;
import reactor.netty.http.client.HttpClient;

public class Application {

	public static void main(String[] args) {
		Metrics.globalRegistry 1
		       .config()
		       .meterFilter(MeterFilter.maximumAllowableTags("reactor.netty.http.client", "URI", 100, MeterFilter.deny()));

		HttpClient client =
				HttpClient.create()
				          .metrics(true, s -> {
				              if (s.startsWith("/stream/")) { 2
				                  return "/stream/{n}";
				              }
				              else if (s.startsWith("/bytes/")) {
				                  return "/bytes/{n}";
				              }
				              return s;
				          }); 3

		client.get()
		      .uri("https://httpbin.org/stream/2")
		      .responseContent()
		      .blockLast();

		client.get()
		      .uri("https://httpbin.org/bytes/1024")
		      .responseContent()
		      .blockLast();
	}
}
为带有
URI标签的计量器应用上限在可能的情况下,将使用模板化 URI 作为 URI 标签值
启用与 Micrometer 的内置集成
为了避免启用指标带来的内存和 CPU 开销,在可能的情况下将真实 URI 转换为模板化 URI 非常重要。如果不转换为模板形式,每个不同的 URI 都会创建一个不同的标签,从而占用大量指标内存。
务必为带有 URI 标签的计量器应用上限。当真实 URI 无法模板化时,配置计量器数量的上限会有所帮助。更多信息请参阅 maximumAllowableTags。
当需要将 HTTP 客户端指标与 Micrometer 之外的系统集成,或者您想提供自己的 Micrometer 集成时,可以按如下方式提供自己的指标记录器:
import reactor.netty.http.client.HttpClient;
import reactor.netty.http.client.HttpClientMetricsRecorder;

import java.net.SocketAddress;
import java.time.Duration;

public class Application {

	public static void main(String[] args) {
		HttpClient client =
				HttpClient.create()
				          .metrics(true, CustomHttpClientMetricsRecorder::new); 1

		client.get()
		      .uri("https://httpbin.org/stream/2")
		      .response()
		      .block();
	}
启用 HTTP 客户端指标,并提供 HttpClientMetricsRecorder 实现。
14. 追踪
HTTP 客户端支持与 Micrometer Tracing 的内置集成。
下表提供了 HTTP 客户端跨度的信息:
| 上下文名称 | 说明 |
|---|---|
| HTTP <HTTP METHOD> | 请求的信息和总时间。请参阅 Http Client Response Span. |
| hostname resolution | 解析地址的信息和所花费的时间。请参阅 Hostname Resolution Span. |
| connect | 连接到远程地址的信息和所花费的时间。请参阅 Connect Span. |
| tls handshake | TLS 握手的信息和所花费的时间。请参阅 Tls Handshake Span. |
以下示例启用了该集成。这个具体示例使用 Brave,并将信息上报到 Zipkin。有关 OpenTelemetry 的设置,请参阅 Micrometer Tracing 文档。
import brave.Tracing;
import brave.propagation.StrictCurrentTraceContext;
import brave.sampler.Sampler;
import io.micrometer.tracing.CurrentTraceContext;
import io.micrometer.tracing.Tracer;
import io.micrometer.tracing.brave.bridge.BraveBaggageManager;
import io.micrometer.tracing.brave.bridge.BraveCurrentTraceContext;
import io.micrometer.tracing.brave.bridge.BravePropagator;
import io.micrometer.tracing.brave.bridge.BraveTracer;
import io.micrometer.tracing.propagation.Propagator;
import reactor.netty.http.client.HttpClient;
import reactor.netty.http.observability.ReactorNettyPropagatingSenderTracingObservationHandler;
import reactor.netty.observability.ReactorNettyTracingObservationHandler;
import zipkin2.reporter.brave.AsyncZipkinSpanHandler;
import zipkin2.reporter.urlconnection.URLConnectionSender;

import static reactor.netty.Metrics.OBSERVATION_REGISTRY;

public class Application {

	public static void main(String[] args) {
		init(); 1

		HttpClient client =
				HttpClient.create()
				          .metrics(true, s -> {
				              if (s.startsWith("/stream/")) { 2
				                  return "/stream/{n}";
				              }
				              return s;
				          }); 3

		client.get()
		      .uri("https://httpbin.org/stream/3")
		      .responseContent()
		      .blockLast();
	}

	/**
	 * This setup is based on
	 * <a href="https://micrometer.io/docs/tracing#_micrometer_tracing_brave_setup">Micrometer Tracing Brave Setup</a>.
	 */
	static void init() {
		AsyncZipkinSpanHandler spanHandler = AsyncZipkinSpanHandler
				.create(URLConnectionSender.create("http://localhost:9411/api/v2/spans"));

		StrictCurrentTraceContext braveCurrentTraceContext = StrictCurrentTraceContext.create();

		CurrentTraceContext bridgeContext = new BraveCurrentTraceContext(braveCurrentTraceContext);

		Tracing tracing =
				Tracing.newBuilder()
				       .currentTraceContext(braveCurrentTraceContext)
				       .supportsJoin(false)
				       .traceId128Bit(true)
				       .sampler(Sampler.ALWAYS_SAMPLE)
				       .addSpanHandler(spanHandler)
				       .localServiceName("reactor-netty-examples")
				       .build();

		brave.Tracer braveTracer = tracing.tracer();

		Tracer tracer = new BraveTracer(braveTracer, bridgeContext, new BraveBaggageManager());

		Propagator propagator = new BravePropagator(tracing);

		OBSERVATION_REGISTRY.observationConfig()
		                    .observationHandler(new ReactorNettyPropagatingSenderTracingObservationHandler(tracer, propagator))
		                    .observationHandler(new ReactorNettyTracingObservationHandler(tracer));
	}
}
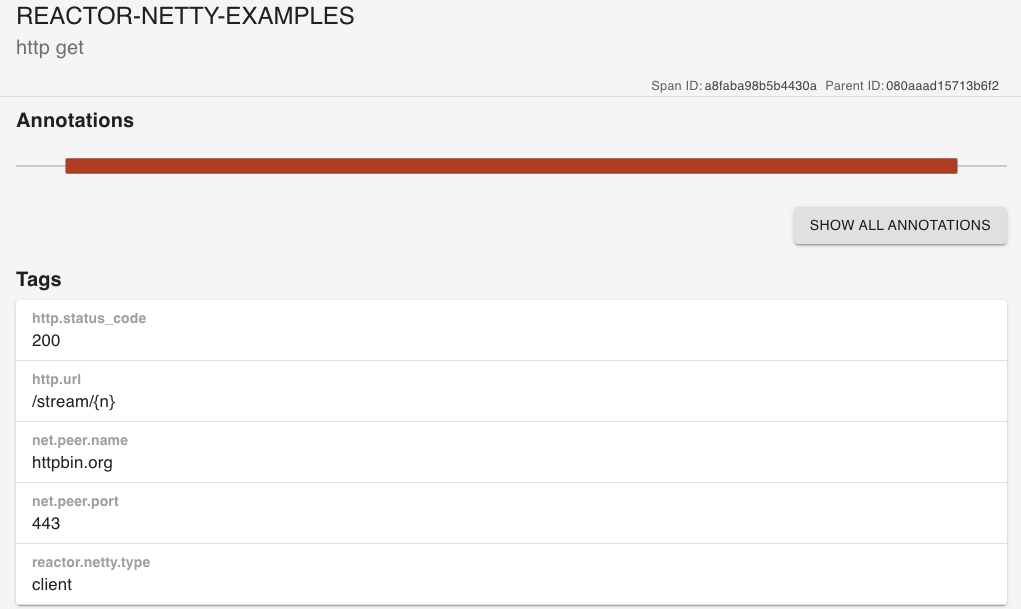
初始化 Brave、Zipkin 以及 Observation 注册表。
在可能的情况下,将模板化 URI 用作 URI 标签值。
启用与 Micrometer 的内置集成。
在 Zipkin 中的结果如下所示:
14.1. 获取当前 Observation
Micrometer 项目提供了一个库,可帮助跨不同类型的上下文机制(如 ThreadLocal、Reactor Context 等)进行上下文传播。
以下示例展示了如何在自定义 ChannelHandler 中使用该库:
import brave.Tracing;
import brave.propagation.StrictCurrentTraceContext;
import brave.sampler.Sampler;
import io.micrometer.context.ContextSnapshot;
import io.micrometer.context.ContextSnapshotFactory;
import io.micrometer.tracing.CurrentTraceContext;
import io.micrometer.tracing.Tracer;
import io.micrometer.tracing.brave.bridge.BraveBaggageManager;
import io.micrometer.tracing.brave.bridge.BraveCurrentTraceContext;
import io.micrometer.tracing.brave.bridge.BravePropagator;
import io.micrometer.tracing.brave.bridge.BraveTracer;
import io.micrometer.tracing.propagation.Propagator;
import io.netty.channel.ChannelHandler;
import io.netty.channel.ChannelHandlerContext;
import io.netty.channel.ChannelOutboundHandlerAdapter;
import io.netty.channel.ChannelPromise;
import reactor.netty.NettyPipeline;
import reactor.netty.http.client.HttpClient;
import reactor.netty.http.observability.ReactorNettyPropagatingSenderTracingObservationHandler;
import reactor.netty.observability.ReactorNettyTracingObservationHandler;
import zipkin2.reporter.brave.AsyncZipkinSpanHandler;
import zipkin2.reporter.urlconnection.URLConnectionSender;

import static reactor.netty.Metrics.OBSERVATION_REGISTRY;

public class Application {

	public static void main(String[] args) {
		init(); 1

		HttpClient client =
				HttpClient.create()
				          .metrics(true, s -> {
				              if (s.startsWith("/stream/")) { 2
				                  return "/stream/{n}";
				              }
				              return s;
				          }) 3
				          .doOnConnected(conn -> conn.channel().pipeline().addAfter(NettyPipeline.HttpCodec,
				                  "custom-channel-handler", CustomChannelOutboundHandler.INSTANCE)); 4

		client.get()
		      .uri("https://httpbin.org/stream/3")
		      .responseContent()
		      .blockLast();
	}

	static final class CustomChannelOutboundHandler extends ChannelOutboundHandlerAdapter {

		static final ChannelHandler INSTANCE = new CustomChannelOutboundHandler();

		@Override
		public boolean isSharable() {
			return true;
		}

		@Override
		public void write(ChannelHandlerContext ctx, Object msg, ChannelPromise promise) {
			try (ContextSnapshot.Scope scope = ContextSnapshotFactory.builder().build().setThreadLocalsFrom(ctx.channel())) {
				System.out.println("Current Observation in Scope: " + OBSERVATION_REGISTRY.getCurrentObservation());
				//"FutureReturnValueIgnored" this is deliberate
				ctx.write(msg, promise);
			}
			System.out.println("Current Observation: " + OBSERVATION_REGISTRY.getCurrentObservation());
		}
	}
初始化 Brave、Zipkin 以及 Observation 注册表。
在可能的情况下,将模板化 URI 用作 URI 标签值。
启用与 Micrometer 的内置集成。
使用上下文传播库的自定义
ChannelHandler。这个具体示例只重写了ChannelOutboundHandlerAdapter#write,如有需要,其余方法也可以使用相同的逻辑。此外,这个具体示例会为给定Channel中存在值的所有ThreadLocal赋值;如果需要其他行为,请查阅上下文传播库 API。例如,您可能只想设置部分ThreadLocal值。
当您在某个框架内启用 Reactor Netty 追踪时,可能需要让 Reactor Netty 使用该框架创建的 ObservationRegistry。为此,您需要调用 reactor.netty.Metrics#observationRegistry。您可能还需要使用该框架提供的 API 来配置 Reactor Netty ObservationHandlers。
15. Unix 域套接字
当使用本地传输时(适用于所有 Java 版本),以及当使用 NIO 传输时(适用于 Java 17 及以上版本),HTTP 客户端支持 Unix 域套接字(UDS)。
以下示例展示了如何使用 UDS 支持:
import io.netty.channel.unix.DomainSocketAddress;
import reactor.netty.http.client.HttpClient;

//import java.net.UnixDomainSocketAddress;

public class Application {

	public static void main(String[] args) {
		HttpClient client =
				HttpClient.create()
				          // The configuration below is available only when NIO transport is used with Java 17+
				          //.remoteAddress(() -> UnixDomainSocketAddress.of("/tmp/test.sock"));
				          // The configuration below is available only when Epoll/KQueue transport is used
				          .remoteAddress(() -> new DomainSocketAddress("/tmp/test.sock")); 1

		client.get()
		      .uri("/")
		      .response()
		      .block();
	}
}
指定将要使用的
DomainSocketAddress
16. 主机名解析
默认情况下,HttpClient 使用 Netty 的域名查找机制来异步解析域名。这是作为 JVM 内置阻塞解析器的替代方案。
当您需要更改默认设置时,可以按如下方式配置 HttpClient:
import reactor.netty.http.client.HttpClient;

import java.time.Duration;

public class Application {

	public static void main(String[] args) {
		HttpClient client =
				HttpClient.create()
				          .resolver(spec -> spec.queryTimeout(Duration.ofMillis(500))); 1

		String response =
				client.get()
				      .uri("https://example.com/")
				      .responseContent()
				      .aggregate()
				      .asString()
				      .block();

		System.out.println("Response " + response);
	}
}
此解析器执行的每次 DNS 查询的超时将为 500ms。
以下清单展示了可用的配置。此外,TCP fallback(TCP 回退)默认是启用的。
| 配置名称 | 说明 |
|---|---|
bindAddressSupplier | 要绑定的本地地址的供应器。 |
cacheMaxTimeToLive | 缓存的 DNS 资源记录的最大生存时间(精度:秒)。如果 DNS 服务器返回的 DNS 资源记录的生存时间大于此最大生存时间,则此解析器会忽略 DNS 服务器给出的生存时间,而使用此最大生存时间。默认为 Integer.MAX_VALUE。 |
cacheMinTimeToLive | 缓存的 DNS 资源记录的最小生存时间(精度:秒)。如果 DNS 服务器返回的 DNS 资源记录的生存时间小于此最小生存时间,则此解析器会忽略 DNS 服务器给出的生存时间,而使用此最小生存时间。默认:0。 |
cacheNegativeTimeToLive | 失败 DNS 查询的缓存生存时间(精度:秒)。默认:0。 |
completeOncePreferredResolved | 启用此设置后,一旦首选地址类型的所有查询完成,解析器即发出通知。禁用此设置后,解析器会在所有可能地址类型都完成时才发出通知。此配置适用于 DnsNameResolver#resolveAll(String)。默认情况下,此设置是启用的。 |
datagramChannelStrategy | 设置用于确定解析器如何通过 UDP 协议发送查询时使用 DatagramChannel 的策略。默认为 DnsNameResolverChannelStrategy#ChannelPerResolver |
disableOptionalRecord | 禁用自动包含一条可选记录,该记录用于向远程 DNS 服务器提示解析器每次响应能够读取多少数据。默认情况下,此设置是启用的。 |
disableRecursionDesired | 指定此解析器是否必须发送设置了递归期望(RD)标志的 DNS 查询。默认情况下,此设置是启用的。 |
dnsAddressResolverGroupProvider | 设置一个自定义函数,用于根据给定的 DnsNameResolverBuilder 创建 DnsAddressResolverGroup。 |
hostsFileEntriesResolver | 设置一个自定义的 HostsFileEntriesResolver,用于 hosts 文件条目。默认:DefaultHostsFileEntriesResolver。 |
maxPayloadSize | 设置数据报分组缓冲区的容量(以字节为单位)。默认:4096。 |
maxQueriesPerResolve | 设置解析主机名时允许发送的最大 DNS 查询数量。默认:16。 |
ndots | 设置在发起首次绝对查询之前,名称中必须出现的点号数量。默认:-1(在 Unix 上从操作系统确定该值,否则使用值 1)。 |
queryTimeout | 设置此解析器执行的每次 DNS 查询的超时(精度:毫秒)。默认:5000。 |
resolveCache | 用于存储已解析 DNS 条目的缓存。 |
resolvedAddressTypes | 已解析地址的协议族列表。 |
retryTcpOnTimeout | 指定在检测到超时时,此解析器是否也回退到 TCP。默认情况下,只有当响应被标记为截断时,解析器才会尝试使用 TCP。 |
roundRobinSelection | 启用由 DnsNameResolver 组成的 AddressResolverGroup,当名称服务器提供多个目标地址时支持随机选择目标地址。请参阅 RoundRobinDnsAddressResolverGroup。默认:DnsAddressResolverGroup |
runOn | 在给定的 LoopResources 上执行与 DNS 服务器的通信。默认情况下,使用客户端级别指定的 LoopResources。 |
searchDomains | 解析器的搜索域列表。默认情况下,有效搜索域列表是使用系统 DNS 搜索域填充的。 |
trace | 当解析失败时,此解析器在生成详细追踪信息时使用的特定日志记录器和日志级别。 |
有时,您可能想切换到 JVM 内置解析器。为此,可以按如下方式配置 HttpClient:
import io.netty.resolver.DefaultAddressResolverGroup;
import reactor.netty.http.client.HttpClient;

public class Application {

	public static void main(String[] args) {
		HttpClient client =
				HttpClient.create()
				          .resolver(DefaultAddressResolverGroup.INSTANCE); 1

		String response =
				client.get()
				      .uri("https://example.com/")
				      .responseContent()
				      .aggregate()
				      .asString()
				      .block();

		System.out.println("Response " + response);
	}
}
设置 JVM 内置解析器。
17. 超时配置
本节介绍可在 HttpClient 中使用的各种超时配置选项。配置恰当的超时可以改善或解决通信过程中的问题。这些配置选项可分组如下:
17.1. 连接池超时
默认情况下,HttpClient 使用连接池。当请求成功完成且连接未被安排关闭时,该连接会被归还到连接池,从而可被复用于处理另一个请求。该连接可能会立即被另一个请求复用,也可能在连接池中空闲一段时间。
以下列表描述了可用的超时配置选项:
maxIdleTime- 此连接在连接池中保持空闲的最长时间(精度:毫秒)。默认情况下,不指定 maxIdleTime。
配置 maxIdleTime 时,您应考虑目标服务器上的空闲超时配置。请选择一个等于或小于目标服务器配置的值。这样做可以减少因目标服务器关闭连接而导致的 I/O 问题。
-
maxLifeTime- 此连接保持存活的最长时间(精度:毫秒)。默认情况下,不指定 maxLifeTime。 -
pendingAcquireTimeout- 挂起获取操作必须完成的最长时间(精度:毫秒),否则会抛出PoolAcquireTimeoutException。默认:45s。
默认情况下,这些超时会在连接 release(释放)或 acquire(获取)操作时进行检查;如果达到某个超时,连接就会被关闭并从连接池中移除。不过,您也可以通过设置 evictInBackground 来配置连接池,从而定期对连接进行检查。
要自定义默认设置,可以按如下方式配置 HttpClient:
import reactor.netty.http.client.HttpClient;
import reactor.netty.resources.ConnectionProvider;

import java.time.Duration;

public class Application {

	public static void main(String[] args) {
		ConnectionProvider provider =
				ConnectionProvider.builder("custom")
				                  .maxConnections(50)
				                  .maxIdleTime(Duration.ofSeconds(20))           1
				                  .maxLifeTime(Duration.ofSeconds(60))           2
				                  .pendingAcquireTimeout(Duration.ofSeconds(60)) 3
				                  .evictInBackground(Duration.ofSeconds(120))    4
				                  .build();

		HttpClient client = HttpClient.create(provider);

		String response =
				client.get()
				      .uri("https://example.com/")
				      .responseContent()
				      .aggregate()
				      .asString()
				      .block();

		System.out.println("Response " + response);

		provider.disposeLater()
		        .block();
	}
}
将连接保持空闲的最长时间配置为 20 秒。
将连接保持存活的最长时间配置为 60 秒。
将挂起获取操作的最长时间配置为 60 秒。
每隔两分钟,会定期检查连接池中适合移除的连接。
17.2. HttpClient 超时
本节提供 HttpClient 级别各种超时配置选项的相关信息。
Reactor Netty 使用 Reactor Core 作为其 Reactive Streams 实现,您可能想使用 Mono 和 Flux 提供的 timeout 操作符。但请记住,最好使用 Reactor Netty 中更具体的超时配置选项,因为它们能针对特定目的和用例提供更精细的控制。相比之下,timeout 操作符只能作用于整个操作,即从与远程对等方建立连接到接收响应的全过程。
17.2.1. 响应超时
HttpClient 提供了一个 API,用于为所有请求配置默认响应超时。您可以通过 API 为特定请求更改此默认响应超时。默认情况下,不指定 responseTimeout。
配置响应超时始终是一种良好实践。
要自定义默认设置,可以按如下方式配置 HttpClient:
import reactor.core.publisher.Mono;
import reactor.netty.http.client.HttpClient;

import java.time.Duration;

public class Application {

	public static void main(String[] args) {
		HttpClient client =
				HttpClient.create()
				          .responseTimeout(Duration.ofSeconds(1));    1

		String response1 =
				client.post()
				      .uri("https://example.com/")
				      .send((req, out) -> {
				          req.responseTimeout(Duration.ofSeconds(2)); 2
				          return out.sendString(Mono.just("body1"));
				      })
				      .responseContent()
				      .aggregate()
				      .asString()
				      .block();

		System.out.println("Response " + response1);

		String response2 =
				client.post()
				      .uri("https://example.com/")
				      .send((req, out) -> out.sendString(Mono.just("body2")))
				      .responseContent()
				      .aggregate()
				      .asString()
				      .block();

		System.out.println("Response " + response2);
	}
}
将默认响应超时配置为 1 秒。
将特定请求的响应超时配置为 2 秒。
17.2.2. 连接超时
以下清单展示了所有可用的连接超时配置选项,但其中一些可能仅适用于特定的传输方式。
-
CONNECT_TIMEOUT_MILLIS- 如果与远程对等方的连接建立尝试未在配置的连接超时(精度:毫秒)内完成,则连接建立尝试失败。默认:30s。 -
SO\_KEEPALIVE- 当连接空闲一段时间后(该时间取决于具体实现,但默认为两小时),TCP 会自动向远程对等方发送keepalive探测。默认情况下,SO_KEEPALIVE 未启用。当您使用Epoll/NIO(在 Mac 或 Linux 上自 Java 11 起)传输运行时,还可以配置:-
TCP_KEEPIDLE- 如果已设置SO_KEEPALIVE,则在 TCP 开始发送keepalive探测之前,此连接保持空闲的最长时间(精度:秒)。该最长时间取决于具体实现,但默认为两小时。 -
TCP_KEEPINTVL(Epoll)/TCP_KEEPINTERVAL(NIO)- 两次keepalive探测之间的时间(精度:秒)。 -
TCP_KEEPCNT(Epoll)/TCP_KEEPCOUNT(NIO)- TCP 在断开连接之前应发送的keepalive探测的最大次数。
-
有时,在客户端和服务器之间可能存在这样一个网络组件:它会静默地丢弃空闲连接而不发送任何响应。从 Reactor Netty 的角度来看,在这种用例下,远程对等方就是没有响应。为了能够处理这种用例,您可以考虑配置 SO_KEEPALIVE。
要自定义默认设置,可以按如下方式配置 HttpClient:
import io.netty.channel.ChannelOption;
import io.netty.channel.epoll.EpollChannelOption;
//import io.netty.channel.socket.nio.NioChannelOption;
//import jdk.net.ExtendedSocketOptions;
import reactor.netty.http.client.HttpClient;
import java.net.InetSocketAddress;

public class Application {

	public static void main(String[] args) {
		HttpClient client =
				HttpClient.create()
				          .bindAddress(() -> new InetSocketAddress("host", 1234))
				          .option(ChannelOption.CONNECT_TIMEOUT_MILLIS, 10000) 1
				          .option(ChannelOption.SO_KEEPALIVE, true)            2
				          // The options below are available only when NIO transport (Java 11) is used
				          // on Mac or Linux (Java does not currently support these extended options on Windows)
				          // https://bugs.openjdk.java.net/browse/JDK-8194298
				          //.option(NioChannelOption.of(ExtendedSocketOptions.TCP_KEEPIDLE), 300)
				          //.option(NioChannelOption.of(ExtendedSocketOptions.TCP_KEEPINTERVAL), 60)
				          //.option(NioChannelOption.of(ExtendedSocketOptions.TCP_KEEPCOUNT), 8);
				          // The options below are available only when Epoll transport is used
				          .option(EpollChannelOption.TCP_KEEPIDLE, 300)        3
				          .option(EpollChannelOption.TCP_KEEPINTVL, 60)        4
				          .option(EpollChannelOption.TCP_KEEPCNT, 8);          5

		String response =
				client.get()
				      .uri("https://example.com/")
				      .responseContent()
				      .aggregate()
				      .asString()
				      .block();

		System.out.println("Response " + response);
	}
}
将连接建立超时配置为 10 秒。
启用 TCP
keepalive。这意味着当连接空闲一段时间后,TCP 开始发送keepalive探测。连接需要保持空闲 5 分钟,TCP 才开始发送
keepalive探测。将两次
keepalive探测之间的时间配置为 1 分钟。将 TCP
keepalive探测的最大次数配置为 8。
17.2.3. SSL/TLS 超时
HttpClient 支持 Netty 提供的 SSL/TLS 功能。
以下列表描述了可用的超时配置选项:
handshakeTimeout- 使用此选项配置 SSL 握手超时(精度:毫秒)。默认:10s。
当预期会有慢速网络连接时,您应考虑增大 SSL 握手超时。
-
closeNotifyFlushTimeout- 使用此选项配置 SSLclose_notify刷新超时(精度:毫秒)。默认:3s。 -
closeNotifyReadTimeout- 使用此选项配置 SSLclose_notify读取超时(精度:毫秒)。默认:0s。
要自定义默认设置,可以按如下方式配置 HttpClient:
import reactor.netty.http.Http11SslContextSpec;
import reactor.netty.http.client.HttpClient;

import java.time.Duration;

public class Application {

	public static void main(String[] args) {
		Http11SslContextSpec http11SslContextSpec = Http11SslContextSpec.forClient();

		HttpClient client =
				HttpClient.create()
				          .secure(spec -> spec.sslContext(http11SslContextSpec)
				                              .handshakeTimeout(Duration.ofSeconds(30))         1
				                              .closeNotifyFlushTimeout(Duration.ofSeconds(10))  2
				                              .closeNotifyReadTimeout(Duration.ofSeconds(10))); 3

		String response =
				client.get()
				      .uri("https://example.com/")
				      .responseContent()
				      .aggregate()
				      .asString()
				      .block();

		System.out.println("Response " + response);
	}
}
将 SSL 握手超时配置为 30 秒。
将 SSL
close_notify刷新超时配置为 10 秒。将 SSL
close_notify读取超时配置为 10 秒。
17.2.4. 代理超时
HttpClient 支持 Netty 提供的代理功能,并提供了指定连接建立超时的方式。如果与远程对等方的连接建立尝试未在该超时内完成,则连接建立尝试失败。默认:10s。
要自定义默认设置,可以按如下方式配置 HttpClient:
import reactor.netty.http.client.HttpClient;
import reactor.netty.transport.ProxyProvider;

public class Application {

	public static void main(String[] args) {
		HttpClient client =
				HttpClient.create()
				          .proxy(spec -> spec.type(ProxyProvider.Proxy.HTTP)
				                             .host("proxy")
				                             .port(8080)
				                             .nonProxyHosts("localhost")
				                             .connectTimeoutMillis(20_000)); 1

		String response =
				client.get()
				      .uri("https://example.com/")
				      .responseContent()
				      .aggregate()
				      .asString()
				      .block();

		System.out.println("Response " + response);
	}
}
将连接建立超时配置为 20 秒。
17.2.5. 主机名解析超时
默认情况下,HttpClient 使用 Netty 的域名查找机制来异步解析域名。
以下列表描述了可用的超时配置选项:
-
cacheMaxTimeToLive- 缓存的 DNS 资源记录的最大生存时间(精度:秒)。如果 DNS 服务器返回的 DNS 资源记录的生存时间大于此最大生存时间,则此解析器会忽略 DNS 服务器给出的生存时间,而使用此最大生存时间。默认:Integer.MAX_VALUE。 -
cacheMinTimeToLive- 缓存的 DNS 资源记录的最小生存时间(精度:秒)。如果 DNS 服务器返回的 DNS 资源记录的生存时间小于此最小生存时间,则此解析器会忽略 DNS 服务器给出的生存时间,而使用此最小生存时间。默认:0s。 -
cacheNegativeTimeToLive- 失败 DNS 查询的缓存生存时间(精度:秒)。默认:0s。 -
queryTimeout- 设置此解析器执行的每次 DNS 查询的超时(精度:毫秒)。默认:5s。
要自定义默认设置,可以按如下方式配置 HttpClient:
import reactor.netty.http.client.HttpClient;

import java.time.Duration;

public class Application {

	public static void main(String[] args) {
		HttpClient client =
				HttpClient.create()
				          .resolver(spec -> spec.queryTimeout(Duration.ofMillis(500))); 1

		String response =
				client.get()
				      .uri("https://example.com/")
				      .responseContent()
				      .aggregate()
				      .asString()
				      .block();

		System.out.println("Response " + response);
	}
}
此解析器执行的每次 DNS 查询的超时将为 500ms。